
This article helps you to install and configure basic mail server on Centos 7. Here i have used Postfix for SMTP, Dovecot for POP/IMAP and Dovecot SASL for SMTP AUTH.
Before proceeding please make sure you have assigned static IP for the server and have internet connectivity for installing packages.
Setup mail server on centos 7
1. Installing packages
2. Postfix configuration
3. Dovecot configuration
4. User creation
Installing packages
Step 1 » Assign hostname for the server using the below command.
[root@krizna ~]# hostnamectl set-hostname mail.krizna.com
Step 2 » Make a host entry with your IP in /etc/hosts file.
172.27.0.51 mail.krizna.com
Step 3 » Now start installing packages.
[root@krizna ~]# yum -y install postfix dovecot
After package installation continue with postfix configuration.
Postfix configuration
First create SSL certificate for encryption.
Step 4 » Follow the below steps one by one for creation.
[root@mail ~]# mkdir /etc/postfix/sslLeave blank for A challenge password [] value in the below step.
[root@mail ~]# cd /etc/postfix/ssl
[root@krizna ssl]# openssl genrsa -des3 -out server.key 2048
[root@krizna ssl]# openssl rsa -in server.key -out server.key.insecure
[root@krizna ssl]# mv server.key server.key.secure
[root@krizna ssl]# mv server.key.insecure server.key
[root@krizna ssl]# openssl req -new -key server.key -out server.csr
 [root@krizna ssl]# openssl x509 -req -days 365 -in server.csr -signkey server.key -out server.crt
Step 5 » Now open /etc/postfix/main.cf file for changes.
Find and uncomment the below lines.
#inet_interfaces = localhost #---> line no 116
 #mydestination = $myhostname, localhost.$mydomain, localhost #--> line no 164
and add below lines at the end of the file. change myhostname and mydomain values with yours and home_mailbox value to your desired directory. Here it will store mails in the users home directory (Eg: /home/john/mail ).
myhostname = mail.krizna.com
mydomain = krizna.com
myorigin = $mydomain
home_mailbox = mail/
mynetworks = 127.0.0.0/8
inet_interfaces = all
mydestination = $myhostname, localhost.$mydomain, localhost, $mydomain
smtpd_sasl_type = dovecot
smtpd_sasl_path = private/auth
smtpd_sasl_local_domain =
smtpd_sasl_security_options = noanonymous
broken_sasl_auth_clients = yes
smtpd_sasl_auth_enable = yes
smtpd_recipient_restrictions = permit_sasl_authenticated,permit_mynetworks,reject_unauth_destination
smtp_tls_security_level = may
smtpd_tls_security_level = may
smtp_tls_note_starttls_offer = yes
smtpd_tls_loglevel = 1
smtpd_tls_key_file = /etc/postfix/ssl/server.key
smtpd_tls_cert_file = /etc/postfix/ssl/server.crt
smtpd_tls_received_header = yes
smtpd_tls_session_cache_timeout = 3600s
tls_random_source = dev:/dev/urandom
Step 6 » Open /etc/postfix/master.cf file, add the below lines after “smtp inet n – n – – smtpd” line.
submission     inet  n       -       n       -       -       smtpd
  -o syslog_name=postfix/submission
  -o smtpd_sasl_auth_enable=yes
  -o smtpd_recipient_restrictions=permit_sasl_authenticated,reject
  -o milter_macro_daemon_name=ORIGINATING
smtps     inet  n       -       n       -       -       smtpd
  -o syslog_name=postfix/smtps
  -o smtpd_sasl_auth_enable=yes
  -o smtpd_recipient_restrictions=permit_sasl_authenticated,reject
  -o milter_macro_daemon_name=ORIGINATING
Now check the configuration using postfix check command.
Step 7 » Now configure Dovecot SASL for SMTP Auth. Open /etc/dovecot/conf.d/10-master.conf file, find “# Postfix smtp-auth” line ( line no:95 ) and add the below lines.
# Postfix smtp-auth
 unix_listener /var/spool/postfix/private/auth {
 mode = 0660
 user = postfix
 group = postfix
 }
Step 8 » Open /etc/dovecot/conf.d/10-auth.conf file, find “auth_mechanisms = plain” ( Line no: 100 ) and add login to the value like below.
auth_mechanisms = plain login
Step 9 » Postfix configuration is over. Now restart both postfix and dovecot services and enable auto start.
[root@mail ~]# systemctl restart postfix
 [root@mail ~]# systemctl enable postfix
 [root@mail ~]# systemctl restart dovecot
 [root@mail ~]# systemctl enable dovecot
Step 10 » Add the firewall rules to allow 25, 587 and 465 ports.
[root@mail ~]# firewall-cmd --permanent --add-service=smtpNow start testing connectivity for each ports 25,587 and 465 using telnet and make sure you are getting AUTH PLAIN LOGIN line after issuing ehlo mail.krizna.com command in telnet.
[root@mail ~]# firewall-cmd --permanent --add-port=587/tcp
[root@mail ~]# firewall-cmd --permanent --add-port=465/tcp
[root@mail ~]# firewall-cmd --reload
[root@mail ~]# telnet mail.krizna.com 465
 Trying 172.27.0.51...
 Connected to mail.krizna.com.
 Escape character is '^]'.
 220 mail.krizna.com ESMTP Postfix
 ehlo mail.krizna.com <------- Type this command
250-mail.krizna.com
250-PIPELINING
250-SIZE 10240000
250-VRFY
250-ETRN
250-STARTTLS
250-AUTH PLAIN LOGIN
250-AUTH=PLAIN LOGIN
250-ENHANCEDSTATUSCODES
250-8BITMIME
250 DSN
Dovecot configuration
Start configuring Dovecot .
Step 11 » Open /etc/dovecot/conf.d/10-mail.conf file, find #mail_location = (line no : 30 ) and add the same directory which is given to home_mailbox in the postfix config file ( Step 5).
mail_location = maildir:~/mail
Step 12 » Open /etc/dovecot/conf.d/20-pop3.conf file, find and uncomment the below line ( line no : 50 ) .
pop3_uidl_format = %08Xu%08Xv
Step 13 » Restart dovecot service.
[root@mail ~]# systemctl restart dovecot
Step 14 » Add firewall rules to allow 110,143,993 and 995.
[root@mail ~]# firewall-cmd --permanent --add-port=110/tcp
 [root@mail ~]# firewall-cmd --permanent --add-service=pop3s
 [root@mail ~]# firewall-cmd --permanent --add-port=143/tcp
 [root@mail ~]# firewall-cmd --permanent --add-service=imaps
 [root@mail ~]# firewall-cmd --reload
Check the connectivity for the ports 110,143,993 and 995 using telnet.
User creation
Now create user for testing .
Step 15 » Create user with /sbin/nologin shell to restrict login access.
[root@mail ~]# useradd -m john -s /sbin/nologin
 [root@mail ~]# passwd john
Mail server is ready now, Configure user in your mail client and test send/receive.
Also see :
» Setup mail server on ubuntu 14.04
» Setup mail server on centos 6
All the best.
This is my second time setting up a Linux email server. Following the directions in your tutorial for setting up an email server in CentOS 6, I was able to set up a working email server on CentOS 7. After realizing that you made a tutorial specifically for CentOS 7, I decided to try it out on a fresh system. I’m having some troubles though…
If I’m reading it right, according to this tutorial, the only files in /etc/postfix/ssl in the end are: server.key, server.key.secure, server.csr, server.crt
However, the edits to /etc/postfix/main.cf make reference to the following in /etc/postfix/ssl which are not present: smtpd.key, smtpd.crt, cacert.pem
postfix is failing to send email with errors in /var/log/maillog like:
warning: cannot get RSA certificate from file /etc/postfix/ssl/smtpd.crt: disabling TLS support
warning: TLS library problem: 11134:error:02001002:system library:fopen:No such file or directory:bss_file.c:398:fopen(‘/etc/postfix/ssl/smtpd.crt’,’r’):
and
cannot load Certificate Authority data: disabling TLS support
warning: TLS library problem: 8846:error:02001002:system library:fopen:No such file or directory:bss_file.c:169:fopen(‘/etc/postfix/ssl/cacert.pem’,’r’):
I suppose I can rename all of the “server” files to “smtpd” files, but then I’m still missing cacert.pem. Am I missing a step?
Thanks LinuxGuyF28A4E59, post updated . Just remove that cacert.pem line and rename smtpd.* to server .* .. Thanks for checking ..
BTW, how to set ip DKIM (DomainKeys Identified Mail) working with postfix after i follow though this doc? (Can i just use server.key in this doc for DKIM TXT record?)
Fantastic article; right level of depth and explanation. I am new to setting up mail servers on linux, and this article was incredibly helpful. Now have a working mail server for JIRA to use; many thanks!
Very clear and systematic instructions, and I think I have followed them correctly. Unfortunately I have not yet got postfix working. At least, I’m at the stage of trying to test it using telnet, and it keeps either rejecting the connection or closing the connection. I’m stumped. It’s either:
$ telnet smtp.mydomain.com.au 587
Trying 10.10.0.58…
telnet: connect to address 10.10.0.58: Connection refused
telnet: Unable to connect to remote host
$
or
$ telnet smtp.mydomain.com.au 25
Trying 10.10.0.58…
Connected to smtp.mydomain.com.au.
Escape character is ‘^]’.
Connection closed by foreign host.
$
The result for 465 is the same as for 25. All three ports are open in the firewall (25, 465 and 587). I have no idea where to go from here. I suspect that I have missed or mistyped something while following the instructions above, but I have no ideas on how to troubleshoot it to find the issue.
Any troubleshooting pointers?
did you make port forwording on router ?
No, no port forwarding on router.
I got the same error in Fedora 22. and there must has some error with this doc.
You don’t need to forward any ports on your router if you’re doing this within a single network, which I would recommend for initial setup and testing. Once you know it’s working within one network, then forward the ports on your router to permit access from other networks.
The document states to include two directives for inet_interfaces. Make sure you only have:
inet_interfaces = all
If that’s followed by:
inet_interfaces = localhost
then postifx will only listen on the link-local interface.
You can see what interface and port a service is listening on with netstat -plunt
I have the same problem, just instantly closes the connection. Can’t do anything
This work great for me. I got connection refused first, fixed it with correct port forwarding on router
The problem is in the /etc/dovecot/conf.d/10-master.conf file.
I found my answer to the problem here: http://serverfault.com/questions/628966/dovecot-error-unknown-setting-unix-listener
Hello im having the connection refused problem. Have you been able to fix it. If so please help me. Thanks
Alas, I was not able to make this work in the end. I ended up using a different method entirely.
I cannot set up the connection with SSL/TLS instead of STARTTLS. It drop an error. When trying with STARTTLS setting up the account on Mozilla Thunderbird, it says the username and password are incorrect. Tried many times but could do nothing else.
Thank you very much. Very clear
—-
Kamal CHIKH ECHIOUKH
pardon this question, but how did you open the mail GUI…???
How can I access the mail server from UI after completing step 15?
Thanks , everything is work
How i can enable calendar on my mail server ?????
Followed tutorial exactly using a Linode server. Tons of issues. Would not recommend.
Thank you for good and useful article.
Thank you for the instructions. I have one question – How can I set up multiple e-mail addresses for one user in the same domain?
Work great for me on CentOS 7. Running on a google cloud server.
Thanks a lot!
Can i setup Mail on Server using Amazon instance EC2 (Centos 7 already installed). I don’t have any domainm i just have elastic IP which is not really static IP or global IP.
I just fount this “tutorial” and must say ,,,, useless, doesn’t work on my CentOS 7, can open webmail but whatever i do it seems to not sending email or receiving emails.
Any suggestions ?
That’ll get you an answer.. Insult the person that took the time to do this for free…and then ask for suggestions. lol
Good evening,
Please I followed all the configuration steps, but in the end I can not run my email server with SSL support / tls. What should I do?
Answer me please I really need your help
hello,
very clear, thanks but i have a probleme with password user.
Its not working, i test with mozzila thunderbird, and i have a erro for validating password.
so, i change the password user with : passwd john
but after the thunderbird have the error with the new password
please help me….
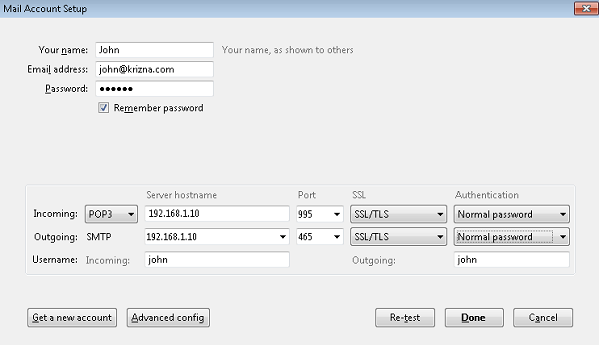
For Thunderbird account setup
Incoming: POP3, server hostname=ip address of server, port=110, ssl=STARTTLS, authentication =normal password
Outgoing: SMTP, server hostname=ip address of server, port=25, ssl=STARTTLS, authentication=normal password
STARTTLS worked for you?
Tested and working here, thank you for your time bro.
Thanks 4 the tutorial!
I did this… and I’ve got
Recipient address rejected: Access denied
while trying to send mail via telnet
Centos7, webmin
Hi Kriza,
Thank you for the well explained tutorial.
If I need to add another domain for the mail service. What changes that I need to do in postfix configuration file?
Hi team,
Nice tutorial. But won’t you have to install bind and add mx records, PTR records and TXT records(contains SPF) so that you can send mails successfully to even Gmail email ID’s and do not get caught in the spam folder
Would really appreciate if someone could help me with the same.
Regards,
Rohan
I can send emails to other mail servers but if i try to send an email to my new mailserver i always get: “Recipient address rejected: User unknown in local recipient table”. Any ideas?
I’m very much new with Linux, at first pardon for my question. Can you please tell me how can I open the mail GUI???
Use mail client like Microsoft outlook or Thunderbird
I’ve done everything in the tutorial, but thunderbird fails to login saying that the credentials are wrong, even thought they aren’t. How can I fix this problem? Thanks
Unable to copy the code from this article!
Hi Team, i am getting error white start postfix, fatal: 0.0.0.0:mission: Servname not supported for ai_socktype
Plaintext authentication disallowed on non-secure (SSL/TLS) connections