
There are many different ways to configure a static IP address on RHEL 8 and Centos 8 servers. Here we can cover these 3 methods .
1) Nmtui Tool
2) Nmcli Tool
3) Editing network config files
For beginners, I would recommend nmtui tool which is easy to assign using TUI. Other 2 methods needs some extra care since all commands and values are case sensitive .
After OS installation, Usually we cannot connect to the server using SSH till we assign the IP address. In this case, You can access the server via remote console and you can assign IP address using any of these methods. Of course you can SSH if you already assigned IP address during installation and you can use this article to modify IP address.
First check the active interfaces on the server using “nmcli con” command
[root@krizna ~]#  nmcli con
 NAME    UUID                                  TYPE      DEVICE
 ens192  1432ce8b-92c1-4bc2-bdf4-2b13b7c96304  ethernet  ens192
 ens224  82ec75e5-6efa-3045-86cc-7c00bb2c403d  ethernet  ens224
Here we have 2 active connections ens192 and ens224. We will see how to assign IP address for ens192 interface using different method.
1) Configure static IP address using Nmtui Tool ( TUI )
Nmtui tool is simple text user interface tool which is very easy to use . You can use this method if you are not familiar with editing files or typing commands.
You can use the arrow keys to move forward and hit enter to select the option on the screen.
We are going to use below details for this method.
- Network interface : ens192
IP address : 192.168.1.10
Subnet prefix : 24
Gateway : 192.168.1.1
DNS : 8.8.8.8
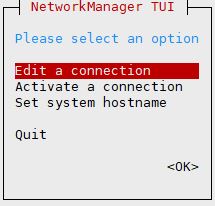
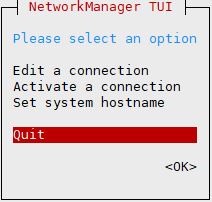
» Type the “nmtui” command to open nmtui GUI.
[root@krizna ~]# nmtui
» Choose “Edit a connection” and press Enter .
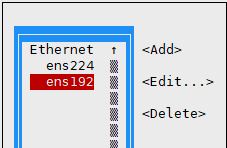
» Here you may see multiple network interfaces connected to the server. so choose the correct interface which you want to configure and press Enter.
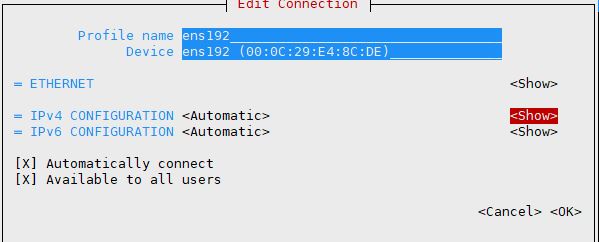
» In this screen you will see many options. however, we will use only few.
Select “show” in IPv4 CONFIGURATION and hit Enter. You will see more options now.
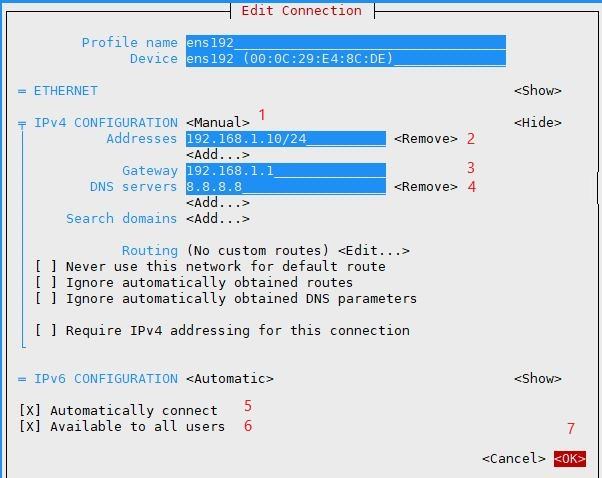
- 1. Select Manual in the dropdown options
2. Enter IP address with subnet mask
3. Enter Gateway
4. Enter DNS servers
5. Choose “Automatically connect” to activate this connection after reboot
6. Choose “Available to all users” to make this connection available for all users.
7. Finally select “ok” at the bottom and hit Enter.
» In the next screen select back and hit enter.
» Now choose Quit and hit enter to exit.
» We have assigned the IP address. Now restart the interface using below commands to update the IP address.
[root@krizna ~]# ifdown ens192
 [root@krizna ~]# ifup ens192
» Verify the IP address using “ip add show
[root@krizna ~]# ip add show ens192
2: ens192:
link/ether 00:0c:29:e4:8c:de brd ff:ff:ff:ff:ff:ff
inet 192.168.1.10/24 brd 192.168.1.255 scope global noprefixroute ens192
valid_lft forever preferred_lft forever
inet6 fe80::1c37:829:75b0:cfa/64 scope link noprefixroute
valid_lft forever preferred_lft forever
2) Configure static IP address using Nmcli Tool
Nmcli tool is a command-line tool installed by default. It is used to create,delete,edit,active and deactivate network connections.
This method is also quite simple to assign the IP address. Follow the steps .
Replace with your IP address and interface name in the following steps.
We are going to use below details for this method.
- Network interface : ens192
IP address : 192.168.1.2
Subnet prefix : 24
Gateway : 192.168.1.1
DNS : 8.8.8.8
» Set the interface configuration method to manual.
[root@krizna ~]# nmcli con mod ens192 ipv4.method manual
» Assign the IP address with subnet prefix 24.
[root@krizna ~]# nmcli con mod ens192 ipv4.addresses 192.168.1.2/24
» Set the gateway for the interface.
[root@krizna ~]# nmcli con mod ens192 ipv4.gateway 192.168.1.1
» Assign DNS nameserver IP.
[root@krizna ~]# nmcli con mod ens192 ipv4.dns "8.8.8.8"
» Now restart the interface using below commands to update the assigned IP address.
[root@krizna ~]# ifdown ens192
 [root@krizna ~]# ifup ens192
» Verify the IP address using “ip add show
[root@krizna ~]# ip add show ens192
2: ens192:
link/ether 00:0c:29:e4:8c:de brd ff:ff:ff:ff:ff:ff
inet 192.168.1.2/24 brd 192.168.1.255 scope global noprefixroute ens192
valid_lft forever preferred_lft forever
inet6 fe80::1c37:829:75b0:cfa/64 scope link noprefixroute
valid_lft forever preferred_lft forever
3) Configure static IP address by editing network config files
On RHEL 8 and Centos 8, Network interface configuration files can be located under /etc/sysconfig/network-scripts/ with file name ifcfg-[interface name]. In our case filename will be ifcfg-ens192.
We are going to use below details for this method.
- Network interface : ens192
IP address : 192.168.1.3
Subnet prefix : 24
Gateway : 192.168.1.1
DNS : 8.8.8.8
» Find the interface config file.
[root@krizna ~]# ls /etc/sysconfig/network-scripts/
 ifcfg-ens192 ifcfg-ens224
» Here you can see ifcfg-ens192 file is present in that location. Now modify below lines in the file using vi editor.
- BOOTPROTO=none
IPADDR=192.168.1.3
PREFIX=24
GATEWAY=192.168.1.1
DNS1=8.8.8.8
Final file should looks like below after modification
[root@krizna ~]# vi /etc/sysconfig/network-scripts/ifcfg-ens192
 TYPE=Ethernet
 PROXY_METHOD=none
 BROWSER_ONLY=no
 BOOTPROTO=none
 DEFROUTE=yes
 IPV4_FAILURE_FATAL=no
 IPV6INIT=yes
 IPV6_AUTOCONF=yes
 IPV6_DEFROUTE=yes
 IPV6_FAILURE_FATAL=no
 IPV6_ADDR_GEN_MODE=stable-privacy
 NAME=ens192
 UUID=1432ce8b-92c1-4bc2-bdf4-2b13b7c96304
 DEVICE=ens192
 ONBOOT=yes
 IPADDR=192.168.1.3
 PREFIX=24
 GATEWAY=192.168.1.1
 DNS1=8.8.8.8
» Now restart the interface using below commands to update the assigned IP address.
[root@krizna ~]# ifdown ens192
 [root@krizna ~]# ifup ens192
» Verify the IP address using “ip add show
[root@krizna ~]# ip add show ens192
2: ens192:
link/ether 00:0c:29:e4:8c:de brd ff:ff:ff:ff:ff:ff
inet 192.168.1.3/24 brd 192.168.1.255 scope global noprefixroute ens192
valid_lft forever preferred_lft forever
inet6 fe80::1c37:829:75b0:cfa/64 scope link noprefixroute
valid_lft forever preferred_lft forever
» Sometimes you may not see the file in that location. In that case, Just create a new file with below content and restart the network using ifup and ifdown commands.
[root@krizna ~]# vi /etc/sysconfig/network-scripts/ifcfg-ens192
 TYPE=Ethernet
 BOOTPROTO=none
 NAME=ens192
 DEVICE=ens192
 ONBOOT=yes
 IPADDR=192.168.1.3
 PREFIX=24
 GATEWAY=192.168.1.1
 DNS1=8.8.8.8
That’s it. All the best.
Also see
How to Setup network on centos 7
Leave a Reply