
After installing Centos 7, You may not able to connect network in that machine. This will happen because Ethernet interfaces are not enabled by default.This guide will help you to setup network on centos 7 .
This guide contains network configuration steps both in GUI and command mode.
Setup network on centos 7
let’s start, Type “nmcli d” command in your terminal for quick identification of Ethernet cards installed in your machine.

Here we have 2 interfaces named “enp0s17” and “enp0s18” . it might be different in your case ( Eg: em1 or p4p1 ).
GUI Mode
Recommended for beginners
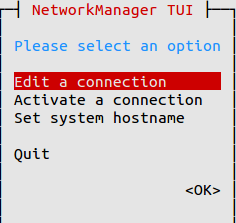
Step 1 » Type this command “nmtui” to open Network manager and press enter after choosing ” Edit a connection” ( Use TAB for choosing options ) .
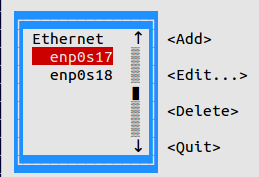
Step 2 » Now you can see all network interfaces, choose one and click “Edit“.
» DHCP configuration
Step 3 » For DHCP,
1. Choose “Automatic” in IPv4 CONFIGURATION.
2. Choose Automatic Connect check box.
3. Press OK and quit Network manager.

Now Restart network service by typing below command.
systemctl restart network Now your server will get IP Address from DHCP .
» Static configuration
Step 4 » For manual IP address,
1. Choose “Manual” in IPv4 CONFIGURATION.
2. Add IP Address with Subnet , Gateway and DNS server ( Refer below image ).
3. Choose Automatic Connect check box.
4. Press OK and quit Network manager.

Now Restart network service by typing below command.
systemctl restart network That’s it, Interface will have static IP.
Command Mode
Step 1 » Network interface config files are located in /etc/sysconfig/network-scripts/ directory. Open ifcfg-enp0s17 file ( For interface enp0s17 ) and you can see the content like below.
[root@krizna ~]# vi /etc/sysconfig/network-scripts/ifcfg-enp0s17
 TYPE=Ethernet
 BOOTPROTO=none
 DEFROUTE=yes
 IPV4_FAILURE_FATAL=no
 IPV6INIT=yes
 IPV6_AUTOCONF=yes
 IPV6_DEFROUTE=yes
 IPV6_FAILURE_FATAL=no
 NAME=enp0s17
 UUID=7f1aff2d-b154-4436-9497-e3a4dedddcef
 ONBOOT=no
 HWADDR=00:0C:29:A1:B5:D6
 PEERDNS=yes
 PEERROUTES=yes
 IPV6_PEERDNS=yes
 IPV6_PEERROUTES=yes
» DHCP configuration
Step 2 » For DHCP
Find the below lines in config File.
BOOTPROTO=none and replace with
ONBOOT=no
BOOTPROTO=dhcpNow Restart network service by typing below command.
ONBOOT=yes
systemctl restart network Now your server will get IP Address from DHCP
» Static configuration
Step 3 » For Static IP.
Find the below lines in config File.
BOOTPROTO=none and replace with
ONBOOT=no
BOOTPROTO=static And add the below lines at the end of the file.
ONBOOT=yes
IPADDR=172.27.0.32File will look like below after changes.
NETMASK=255.255.255.0
GATEWAY=172.27.0.1
DNS1=172.27.0.5
TYPE=Ethernet
 BOOTPROTO=static
 DEFROUTE=yes
 IPV4_FAILURE_FATAL=no
 IPV6INIT=yes
 IPV6_AUTOCONF=yes
 IPV6_DEFROUTE=yes
 IPV6_FAILURE_FATAL=no
 NAME=enp0s17
 UUID=f0c5b37d-299a-43cb-b74b-618bb252d129
 ONBOOT=yes
 HWADDR=00:0C:29:A1:B5:CC
 IPV6_PEERDNS=yes
 IPV6_PEERROUTES=yes
 IPADDR=192.168.1.10
 NETMASK=255.255.255.0
 GATEWAY=192.168.1.1
 DNS1=192.168.1.5
Now Restart network service by typing below command.
systemctl restart networkNow Interface will have static IP.
Additionally you can use /etc/sysconfig/network file for hostname and DNS .
HOSTNAME=server.krizna.com
 DNS1=192.168.1.5
 DNS2=8.8.8.8
 SEARCH=krizna.com
Have a nice day
Also See
Configure a static IP address on RHEL 8 and Centos 8 .
Setup network on ubuntu 18.04
This article is easier. I was searching something like this. Thank you.
This article was helpful. I’m still adjusting to all the changes in v7 — the missing “setup” command to configure/modify basic network settings, the ifcfg-eth0 network configuration file was renamed to something else, and my trusty “service” command was replaced with “systemctl”.
Not complaining, BTW. Having survived through several releases of AIX, Solaris, Redhat/CentOS, and spent time with Debian, Slackware, Caldera, heck even Xandros at one point, plus the always interesting *BSD flavors — largely I’m indifferent.
I have installed CentOS 7.0 but “nmcli d” only gives me my lo lookback device, no Ethernet. I have installed Fedora 21 which uses basically the same interface and it finds my network card.
For some reason it does not activate the network card so that it can be worked on.
Any ideas?
Why does CentOS have the NICs disabled by default? I don’t see that in Ubuntu or
Fedora.
how do i save the changes i made in configuration file and exit in CentOS 7
If you are doing vi, hit escape then type : then type w enter then q to quit enter
Hey thanks for these steps. Saved me some time!
Thank you so much!
Awesome, straight to the point and easy to follow. Thank you!
Thanks, it did save me a lot of time.
Super, excellent guide. Thank you.
My network uses DHCP and when i try to resart or stop and start network.service it says:
“Job for network.service failed. See ‘sytemctl status bla bla bla”
What can i do solve it? I’m using a virtual machine.
Is enp0s17 for wired wifi while enp018 for wireless ?
Same ways to configure wireless ?
Thanks for these steps.
Thanks for the detailed explanation. This worked for me.
Thanks man
exactly looking for
THX 🙂 grear explanation
many thanks
thanks
After Executing this command “nmcli d”
I can see only one lo interface But i could not find Ethernet interface.
I try to configured manually however i am not able to setup. Even i try with two vmware version 1st 11.1.2 and 12.0.1.
Guide me
Bcoz ur ethernet havent up yet. you need to up it
How to up ethernet in VMware ?
when i install a cent os 7 at that time we have a option to set a network configuration such as setting up address but in that option ethernet card was not detected.
My network configuration in vmware is NAT enable.
Also i was try with Bridge however
Yes I do that exactly. Test command result:
traceroute -i inet1 google.com is ok
traceroute -i inet2 google.com – not ok.
How resolve this?
Thanks!
thanks alot.. bless you
Thanks… you save my day…
This is great! Thanks so much. You saved me a lot of time and frustration.
thank’s
Good job! Thanks!
After completing this procedure for static address on Centos7.6 inside a VM on Win10 (Hyper-V), the interface is up with the static address but I cannot ping the gateway. I’ve seen many posts on this issue but none have resolved the problem for me. Do you have any info on this issue that you can point me to?
Thx