
In this tutorial, We are going to see how to setup network on ubuntu 18.04 desktop and server versions. Ubuntu introduced netplan utlity to configure network on ubuntu 18.04 LTS. It uses YAML file format to read network configuration from /etc/netplan/ directory. Here is more information about netplan and Netplan examples .
1) Server version.
2) Desktop version.
Server version
Step 1. By default server version is configured to use dhcp. You could see below settings in /etc/netplan/50-cloud-init.yaml file or You may have different filename like 01-netcfg.yaml.
Filename and interface name (ens32) may differ on environments Virtual OS and Host OS .
network:
    ethernets:
        ens32:
            addresses: []
            dhcp4: true
            optional: true
    version: 2
Here ens32 is your network interface name. “dhcp4: true” value shows that dhcp is enabled for ens32 interface.
So if you have dhcp server in your network, you should able to see ipaddress assigned to your server without making any changes.
Assign Static ipaddress on server
Step 2. To assign static ipaddress to the server. Get ready with network details like subnet,gateway and DNS servers.
Edit /etc/netplan/50-cloud-init.yaml file with all network details as below.
network:
	renderer: networkd
    ethernets:
        ens32:
            dhcp4: no
            dhcp6: no
            addresses: [192.168.1.10/24]
            gateway4: 192.168.1.1
            nameservers:
                addresses: [192.168.1.1,8.8.8.8]
    version: 2
» Here we have disabled both dhcp4 and dhcp6 with no option.
» addresses: line should contains server ipaddress with subnet CIDR Prefix (More about CIDR)
» gateway4: line should contains default gateway.
» nameservers: should contains ipaddresses of primary and secondary DNS.
Please make sure you have added those lines with correct format.
Step 3. Now apply the changes using below command. It would not show any output if it is success.
krizna@leela:~$ sudo netplan apply
 krizna@leela:~$
Now check the status by using below command.
krizna@leela:~$ networkctl status ens32
● 2: ens32
       Link File: /lib/systemd/network/99-default.link
    Network File: /run/systemd/network/10-netplan-ens32.network
            Type: ether
           State: routable (configured)
            Path: pci-0000:02:00.0
          Driver: e1000
          Vendor: Intel Corporation
           Model: 82545EM Gigabit Ethernet Controller (Copper) (PRO/1000 MT Single Port Adapter)
      HW Address: 00:0c:29:0c:ad:a6 (VMware, Inc.)
         Address: 192.168.1.10
                  fe80::20c:29ff:fe0c:ada6
         Gateway: 192.168.1.1
             DNS: 192.168.1.1
                  8.8.8.8
You could see ip address and other network details assigned to the interface.
Step 4. If something wrong or if you see any error while running above command. Use –debug to see more info.
krizna@leela:~$ sudo netplan apply
 Error in network definition //etc/netplan/50-cloud-init.yaml line 12 column 24: expected mapping
krizna@leela:~$ sudo netplan --debug applyHere we see some format error on line number 12 which needs to be corrected.
** (generate:23310): DEBUG: 18:36:12.980: Processing input file //etc/netplan/50-cloud-init.yaml..
** (generate:23310): DEBUG: 18:36:12.980: starting new processing pass
Error in network definition //etc/netplan/50-cloud-init.yaml line 12 column 24: expected mapping
Desktop version
Step 5. Here we are going to see about setup network on ubuntu 18.04 Desktop version. DHCP is enabled by default in desktop version as well.So if you have dhcp server in your network, you should get able to get the ipaddress assigned to your machine without doing any changes.
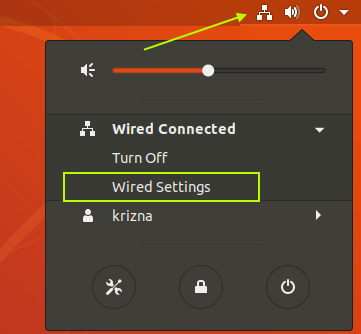
To view the settings click network icon at right top corner next to the volume icon and click “wired settings” or “wireless settings” .
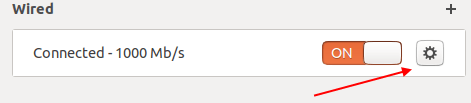
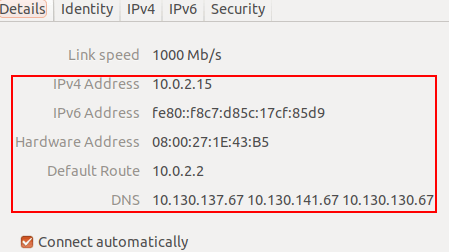
Step 6. Now in network window, Click settings icon under wired or wireless and you would see ipaddress in the allocated by dhcp server.
Assign Static ipaddress on desktop
Step 7. To assign static ipaddress, Click IPv4 tab in the same window and choose manual option .
» Enter static ipaddress with subnet mask in CIDR prefix and gateway.
» Under DNS, Put Automatic to off and Enter DNS ipadresses separated with commas.

Step 8. Now click “Apply” and save the changes. Now restart network service by turnoff and on again.

Click settings again and verify your ipaddress.
Also See
Step 4 helped me a lot . I was hitting my head due to format issue.
Thanks Buddy!!
In this example we have “ens32” as the network interface name. Other on-line example use other names. Is this name just made up and anything one wants will work OR does this relate to a specific network adapter in a machine? If the latter case, how does one know what is available?