
This article explains how to enable remote desktop on ubuntu 16.04 server and cloud versions. Maybe it can be used for desktop versions.
We are going to use VNC package to enable remote desktop connection. So here we can see about installing and configuring VNC service on ubuntu 16.04.
Package installation
First of all we have to install ubuntu desktop and supported packages in order to enable remote desktop on ubuntu server.
So we are going to install ubuntu desktop environment with minimal packages to keeps your server lightweight.
Step 1 » Let’s start. Update the repositories and start installing packages with minimal option. It would take some time to complete.
krizna@leela:~$ sudo apt update
–no-install-recommends key is used to ignore most of all default softwares. So therefore below command only install base packages which is really needed for GUI.
krizna@leela:~$ sudo apt install --no-install-recommends ubuntu-desktop
Step 2 » Now install some additional gnome packages. Most probably these packages will give you best ubuntu look.
krizna@leela:~$ sudo apt install gnome-panel gnome-settings-daemon metacity nautilus gnome-terminal
Step 3 » And finally install vnc4server package.
krizna@leela:~$ sudo apt install vnc4server
Enable remote desktop on ubuntu 16.04
Step 4 » Create a backup of the original vncserver file so that you can restore in case of any issues.
krizna@leela:~$sudo cp /usr/bin/vncserver /usr/bin/vncserver.bkp
Step 5 » And now edit /usr/bin/vncserver file as below.
Find this line
"# exec /etc/X11/xinit/xinitrc\n\n". And add these lines below.
 "gnome-session &\n".
 "gnome-panel &\n".
 "gnome-settings-daemon &\n".
 "metacity &\n".
 "nautilus &\n".
 "gnome-terminal &\n".
Step 5 » Now login as the user and type “vncserver” command to create vnc password and as well as it enables VNC session.
harry@leela:~$ vncserver
You will require a password to access your desktops.
Password:
Verify:
xauth: file /home/harry/.Xauthority does not exist
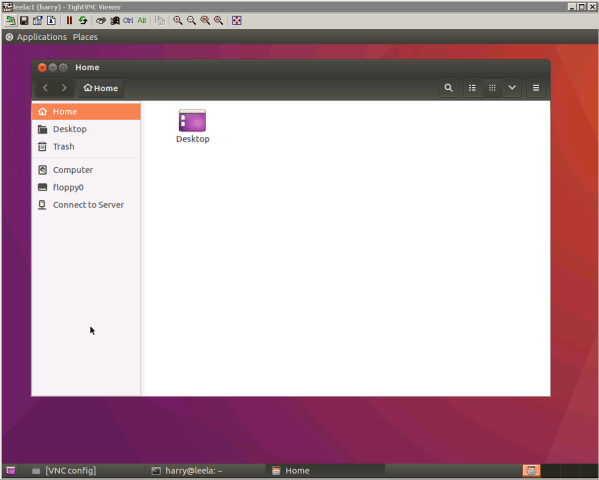
New 'leela:1 (harry)' desktop is leela:1
Creating default startup script /home/harry/.vnc/xstartup
Starting applications specified in /home/harry/.vnc/xstartup
Log file is /home/harry/.vnc/leela:1.log
Step 6 » So now VNC session is started with session number 1.
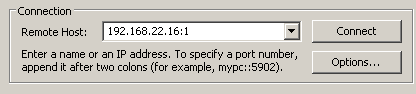
You can access using VNC client ( TightVNC ) with ServerIP:sessionnumber ( Ex: 192.168.0.16:1 ) .
Probably you can have multiple sessions by issuing “vncserver” command multiple times and Also you can access using session numbers 192.168.0.16:2, :3 and so on.
Remote desktop as service
In addition we can configure VNC session as services so that it would start sessions automatically while rebooting the server.
Step 7 » Create service file vncharry@1.service under /etc/systemd/system/ and add below lines.
Replace user name with yours.
So if you want multiple sessions, you need to create another file with same content and have another session number vncharry@2.service.
[Unit]
Description=Start Harry VNC service at startup
After=syslog.target network.target
[Service]
Type=forking
User=harry
PAMName=login
PIDFile=/home/harry/.vnc/%H:%i.pid
ExecStartPre=-/usr/bin/vncserver -kill :%i > /dev/null 2>&1
ExecStart=/usr/bin/vncserver -depth 24 :%i
ExecStop=/usr/bin/vncserver -kill :%i
[Install]
WantedBy=multi-user.target
Step 8 » Start the service and check the status. Before starting the service you must create VNC session password by using “vncserver” or “vncpasswd” command as the user( Refer step 5 ).
krizna@leela:~$ sudo systemctl daemon-reload krizna@leela:~$ sudo systemctl start vncharry@1.service
Now check the status . It Should be active and running.
 krizna@leela:~# sudo systemctl status vncharry@1.service
 ● vncharry@1.service - Start TightVNC server at startup
 Loaded: loaded (/etc/systemd/system/vncharry@1.service; enabled; vendor preset: enabled)
 Active: active (running) since Wed 2017-03-29 12:23:18 IST; 3min 47s ago
 Process: 2205 ExecStart=/usr/bin/vncserver -depth 24 :%i (code=exited, status=0/SUCCESS)
 Process: 2189 ExecStartPre=/usr/bin/vncserver -kill :%i > /dev/null 2>&1 (code=exited, status=2)
 Main PID: 2228 (Xvnc4)
 CGroup: /system.slice/system-vncharry.slice/vncharry@1.service
 ‣ 2228 Xvnc4 :1 -desktop leela:1 (harry) -auth /home/harry/.Xauthority -geometry 1024x768 -depth 24 -rfbwait 30000 -rfbauth /home/harry/.vnc/passwd -rfbport 5901 -pn -fp /usr/X
 Mar 29 12:23:15 leela systemd[1]: Starting Start TightVNC server at startup...
 Mar 29 12:23:15 leela systemd[2189]: pam_unix(login:session): session opened for user harry by (uid=0)
Step 9 » Finally issue below command to make it auto start while reboot.
krizna@leela:~$ sudo systemctl enable vncharry@1.service
 Created symlink from /etc/systemd/system/multi-user.target.wants/vncharry@1.service to /etc/systemd/system/vncharry@1.service.
Now the session will be started automatically after the reboot.
Few additional commands
» Restart session using service. You can issue stop and start with the same command.
krizna@leela:~$ sudo systemctl restart vncharry@1.service
» In order to kill particular session manually
harry@leela:~$ vncserver -kill :1
 Killing Xvnc4 process ID 1137
» You can set custom screen resolution using -geometry 1280×1024
harry@leela:~$ vncserver -geometry 1280x1024 [or]
In the service file edit Execstart line as below
ExecStart=/usr/bin/vncserver -depth 24 -geometry 1280x1024 :%I
As a result remote desktop window is viewed in 1280×1024 resolution.
» You can reset vnc password using vncpasswd command
harry@leela:~$ vncpasswd
 Password:
 Verify:
That’s it
Have a good day.
Also see :
» Install VNC server on ubuntu 14.04
» Install VNC server on centos 7
» How to install Anydesk on ubuntu 20.04
Great article! worked perfrectly. Thanks!