
This tutorial explains how to setup mail server on ubuntu 14.04 using postfix,dovecot and squirrelmail.
» Postfix ( for sending )
» Dovecot ( for receiving )
» Squirrelmail ( for webmail access ).
Here i have used mail.krizna.com for hostname and krizna.com for Domain . please replace with your domain .
Setup mail server on ubuntu 14.04
» Installing and configuring postfix
» Installing and configuring dovecot
» Installing and configuring squirrelmail
» Installing and configuring postfix
Step 1 » Assign static IP and hostname and add a host entry for the host name .
Assign hostname in /etc/hostname
mail.krizna.comAdd a hostentry in /etc/hosts
192.168.1.10 mail.krizna.com
Step 2 » Update the repositories.
krizna@mail:~$ sudo apt-get update
Step 3 » Install postfix and dependencies . Press enter for all prompted questions during installation. we will do that in the next step.
krizna@mail:~$ sudo apt-get install postfix
Step 4 » After installation issue the below command to configure postfix.krizna@mail:~$ sudo dpkg-reconfigure postfixNow you will be prompted for set of details . choose the following values and replace krizna.com with your domain name.
1. Internet Site
2. krizna.com
3. krizna
4. krizna.com, localhost.localdomain, localhost
5. No
6. 127.0.0.0/8 [::ffff:127.0.0.0]/104 [::1]/128 192.168.0.0/24
7. 0
8. +
9. all
Step 5 » Now configure Postfix for SMTP-AUTH using Dovecot SASL by adding the below lines to postfix config file /etc/postfix/main.cf .
home_mailbox = Maildir/
 smtpd_sasl_type = dovecot
 smtpd_sasl_path = private/auth
 smtpd_sasl_local_domain =
 smtpd_sasl_security_options = noanonymous
 broken_sasl_auth_clients = yes
 smtpd_sasl_auth_enable = yes
 smtpd_recipient_restrictions = permit_sasl_authenticated,permit_mynetworks,reject_unauth_destination
 smtp_tls_security_level = may
 smtpd_tls_security_level = may
 smtp_tls_note_starttls_offer = yes
 smtpd_tls_loglevel = 1
 smtpd_tls_received_header = yes
Step 6 » Now generate a digital certificate for tls. Issue the commands one by one and provide details as per your domain.
krizna@mail:~$ openssl genrsa -des3 -out server.key 2048
 krizna@mail:~$ openssl rsa -in server.key -out server.key.insecure
 krizna@mail:~$ mv server.key server.key.secure
 krizna@mail:~$ mv server.key.insecure server.key
 krizna@mail:~$ openssl req -new -key server.key -out server.csr
 krizna@mail:~$ openssl x509 -req -days 365 -in server.csr -signkey server.key -out server.crt
 krizna@mail:~$ sudo cp server.crt /etc/ssl/certs
 krizna@mail:~$ sudo cp server.key /etc/ssl/private
Step 7 » Now configure certificate path
krizna@mail:~$ sudo postconf -e 'smtpd_tls_key_file = /etc/ssl/private/server.key'
 krizna@mail:~$ sudo postconf -e 'smtpd_tls_cert_file = /etc/ssl/certs/server.crt'
Step 8 » Open /etc/postfix/master.cf file and uncomment below lines to enable smtps ( 465 ) and submission ( 587 ) .
submission inet n       -       -       -       -       smtpd
  -o syslog_name=postfix/submission
  -o smtpd_tls_security_level=encrypt
  -o smtpd_sasl_auth_enable=yes
  -o smtpd_relay_restrictions=permit_sasl_authenticated,reject
  -o milter_macro_daemon_name=ORIGINATING
smtps     inet  n       -       n       -       -       smtpd
  -o syslog_name=postfix/smtps
  -o smtpd_tls_wrappermode=yes
  -o smtpd_sasl_auth_enable=yes
  -o smtpd_relay_restrictions=permit_sasl_authenticated,reject
  -o milter_macro_daemon_name=ORIGINATING
Step 9 » Now install Dovecot SASL by typing the below command.
krizna@mail:~$ sudo apt-get install dovecot-commonIssue the following values for the prompts during installation.
1. yes
2. mail.krizna.com
Step 10 » Make changes to the files as follows.
Open /etc/dovecot/conf.d/10-master.conf file and find # Postfix smtp-auth line ( line no:95 ) and add the below lines .
# Postfix smtp-authOpen /etc/dovecot/conf.d/10-auth.conf file and find (line no:100)
unix_listener /var/spool/postfix/private/auth {
mode = 0660
user = postfix
group = postfix
}
auth_mechanisms = plain and replace auth_mechanisms = plain login
Step 11 » Restart postfix and dovecot services
krizna@mail:~$ sudo service postfix restart
 krizna@mail:~$ sudo service dovecot restart
Step 12 » Now test SMTP-AUTH and smtp/pop3 port access .
Type the below command and should get below response.
krizna@mail:~$ telnet mail.krizna.com smtpnow type ehlo mail.krizna.com and should get below response , please make sure you get those bolded lines .
Trying 127.0.0.1...
Connected to localhost.
Escape character is '^]'.
220 mail.kriznaa.com ESMTP Postfix (Ubuntu)
ehlo mail.krizna.com and try the same with port 587 (telnet mail.krizna.com 587).
250-mail.krizna.com
--------
250-STARTTLS
250-AUTH PLAIN LOGIN
250-AUTH=PLAIN LOGIN
---------
250 DSN
Postfix configuration is over, continue for dovecot installation.
» Installing and configuring dovecot
Step 12 » Install dovecot using the below command
krizna@mail:~$ sudo apt-get install dovecot-imapd dovecot-pop3d
Step 13 » Now configure mailbox. Open /etc/dovecot/conf.d/10-mail.conf file and find (Line no:30 )
mail_location = mbox:~/mail:INBOX=/var/mail/%uReplace with
mail_location = maildir:~/Maildir
Step 14 » Now change pop3_uidl_format . Open /etc/dovecot/conf.d/20-pop3.conf file and find and uncomment the below line ( Line no : 50 )
pop3_uidl_format = %08Xu%08Xv
Step 15 » Now enable SSL . Open /etc/dovecot/conf.d/10-ssl.conf file and find and uncomment the below line ( Line no : 6 )
ssl = yes
Step 16 »Restart dovecot service.
krizna@mail:~$ sudo service dovecot restart
Step 17 » Now test pop3 and imap port access using the telnet command.
krizna@mail:~$ telnet mail.krizna.com 110 Repeat the same for 995,993,143 ports.
Trying 127.0.0.1...
Connected to localhost.
Escape character is '^]'.
+OK Dovecot (Ubuntu) ready.
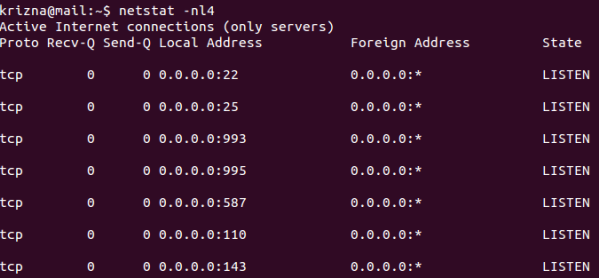
OR check for listening ports using netstat command .
krizna@mail:~$ netstat -nl4 you should get the result like below.
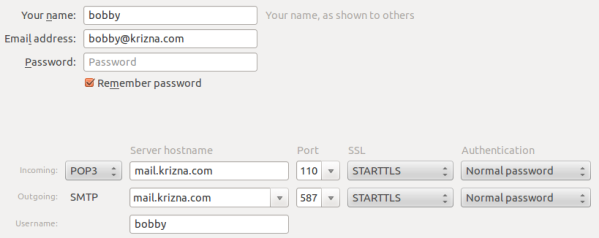
Step 18 » Create some users and check using mail clients like thunderbird or outlook
krizna@mail:~$ sudo useradd -m bobby -s /sbin/nologin
 krizna@mail:~$ sudo passwd bobby
Now mail server is ready, you can send and receive mail using the server. Continue for squirrelmail ..
» Installing and configuring squirrelmail
Step 19 » Install squirrelmail using the below command. This will install apache and PHP packages.
krizna@mail:~$ sudo apt-get install squirrelmail
Step 20 » Configure squirrelmail
krizna@mail:~$ sudo squirrelmail-configureEverything is pre-configured , we just need to change Organization name .
» Press 1 (Organization Preferences) » again press 1 (Organization Name) » Organization Name » Press S » Press Q to quit
Step 19 » Now configure apache to enable squirrelmail .
krizna@mail:~$ sudo cp /etc/squirrelmail/apache.conf /etc/apache2/sites-available/squirrelmail.conf
 krizna@mail:~$ sudo a2ensite squirrelmail
Step 20 » Restart Apache service
krizna@mail:~$ sudo service apache2 restart
Step 21 » Now open http://serverIP/squirrelmail in your browser and login using username (bobby) . you can send and receive mail using squirrelmail.
Okay .. its over now ..
Please note when you decide to move server to the production, it is very important to implement Spam filter and antivirus . please check this post for more detail Postfix spamfilter and antivirus implementation
Also see :
» Setup mail server on centos 7
» Setup mail server on centos 6
I’ve just realized that’s a blog in English kkkk!!! I meant in my previous comment that this article about Postfix’s installation and configuration was SO useful, it worked out perfectly I didn’t even needed to tweak something after to finish the how-to, great!! Thank you SOO much!!!
thanks! work perfectly!
just a question: how i can create an alias email?
thanks! work perfectly!
just a question: how i can create an alias email?
YourBox~# sudo nano /etc/aliases
___________________________
Name: aliases
___________________________
YourBox~# newaliases
thanks you for your help but i follow all the steps but 11, 995, 993 is not available in my ubuntu server
This is great, I just wanted to setup a simple mail thing and this tutorial is the onlything that worked. My only issue is that if I send an email out from squirelmail it gets marked as spam in gmail, any way to fix that?
Check blacklisting~ I was lucky, sertting up a MTA, MUA, PIM setup on a very old connection with DNS in place. I ran into problems replicating this for my own office. The answer is learning how to properly set up DNS, security, and understanding postfix/ dovecot. Look beyond the tutorial and actually read the config scripts. The orriginal programmers did a great job at keeping the language simple and concise. There are a few parts where you will have to Google for clarification. Also, make comments as you go! change one line at a time, document your thought process. This will help maintain forward momentum. Setting up a mail server in Linux is a milestone that every aspiring NetAdmin must surpass. By the time you finish this process, you can pretty much shred that UNIX cheatsheet hidden under your blotter, as you will have mastered enough BASh to move towards intermediate commands. I am using Mint 17 for this.
great post but port 111, 143, and 993 is not work. what should i have to do ? now. suggestion plz.
Do you have a firewall blocking ports?
hi krizna
thank you for the tutorial but im facing a challenge on
adding mail users to groups “usermod -a -G groupname user” is not
working for me
still a novice in linux
thanks in advance
You only need to use:
sudo useradd -m -s /sbin/nologin
sudo passwd
thanks Alexis Mora
I tried it but it was not working for me but changing the aliases file using vi /etc/aliases worked for me….
sales: userone,usertwo
markerting: userthree,userfour
I got error message:
postfix/smtpd[30186]: NOQUEUE: reject: RCPT from unknown
warning: non-null host address bits in “127.0.0.1/24”, perhaps you should use “127.0.0.0/24” instead
Please Help! :O
I’m having a problem where my e-mails are not being received by dovecot.
Has anybody an idea for solve this problem?
i got the following error in squirrelmail
ERROR: Could not complete request.
Query: SELECT “INBOX”
Reason Given: [SERVERBUG] Internal error occurred. Refer to server log for more information. [2015-05-12 15:41:33]
how can i fix it?
I you are having a problem where e-mails are not being received by dovecot:
sudo sed -i “/mailbox_command/ s/^/# /” /etc/postfix/main.cf
The problem was with with mailbox_command. When i just commented out the line containing mailbox_command, it worked.
Well to work with SSL or to work AT ALL!
why when i restart apache2 they said its failed 🙁 i cant open email by squirrel 🙁
try a2ensite squirrelmail.conf
I had a problem receving email with squirrelmail. I resolved this by running the /etc/squirrelmail/conf.pl script. Select 2.Server Settings, then A. Update IMAP Settings 8. Server Software = dovecot. When I installed it was set to other instead of dovecot.
unable to telnet to mail server at step17 above need help
help i can’t login,what i get is ERROR:
ERROR: Connection dropped by IMAP server.
Great post, everything worked perfectly for me… Thank you very much and i will keep visiting your site for different installs
What should be the output for the telnet with port 587? I dont have those bolded lines for 587. Is this okay?
Hello, i have error.
/usr/sbin/postconf: warning: /etc/postfix/master.cf: undefined parameter: mua_helo_restrictions
/usr/sbin/postconf: warning: /etc/postfix/master.cf: undefined parameter: mua_sender_restrictions
/usr/sbin/postconf: warning: /etc/postfix/master.cf: undefined parameter: mua_client_restrictions
/usr/sbin/postconf: warning: /etc/postfix/master.cf: undefined parameter: mua_helo_restrictions
So how can i fix it? thanks.
Thank. It’s work. Very good.
My server is configured and i am able to send and receive mail using squirrelmail but when i try to send and receive mails through thunderbird from other PC in network it doesn’t find the server although it is in the same network and i am able to ping the server ip also……..pls guide
Check if both computers are in the same domain or workgroup
Really Great guidance……..Thanks for it……..Can i send mail from gmail to the server i made and vice versa…………If yes……please tell how?