
This tutorial explains how to setup mail server on ubuntu 14.04 using postfix,dovecot and squirrelmail.
» Postfix ( for sending )
» Dovecot ( for receiving )
» Squirrelmail ( for webmail access ).
Here i have used mail.krizna.com for hostname and krizna.com for Domain . please replace with your domain .
Setup mail server on ubuntu 14.04
» Installing and configuring postfix
» Installing and configuring dovecot
» Installing and configuring squirrelmail
» Installing and configuring postfix
Step 1 » Assign static IP and hostname and add a host entry for the host name .
Assign hostname in /etc/hostname
mail.krizna.comAdd a hostentry in /etc/hosts
192.168.1.10 mail.krizna.com
Step 2 » Update the repositories.
krizna@mail:~$ sudo apt-get update
Step 3 » Install postfix and dependencies . Press enter for all prompted questions during installation. we will do that in the next step.
krizna@mail:~$ sudo apt-get install postfix
Step 4 » After installation issue the below command to configure postfix.krizna@mail:~$ sudo dpkg-reconfigure postfixNow you will be prompted for set of details . choose the following values and replace krizna.com with your domain name.
1. Internet Site
2. krizna.com
3. krizna
4. krizna.com, localhost.localdomain, localhost
5. No
6. 127.0.0.0/8 [::ffff:127.0.0.0]/104 [::1]/128 192.168.0.0/24
7. 0
8. +
9. all
Step 5 » Now configure Postfix for SMTP-AUTH using Dovecot SASL by adding the below lines to postfix config file /etc/postfix/main.cf .
home_mailbox = Maildir/
 smtpd_sasl_type = dovecot
 smtpd_sasl_path = private/auth
 smtpd_sasl_local_domain =
 smtpd_sasl_security_options = noanonymous
 broken_sasl_auth_clients = yes
 smtpd_sasl_auth_enable = yes
 smtpd_recipient_restrictions = permit_sasl_authenticated,permit_mynetworks,reject_unauth_destination
 smtp_tls_security_level = may
 smtpd_tls_security_level = may
 smtp_tls_note_starttls_offer = yes
 smtpd_tls_loglevel = 1
 smtpd_tls_received_header = yes
Step 6 » Now generate a digital certificate for tls. Issue the commands one by one and provide details as per your domain.
krizna@mail:~$ openssl genrsa -des3 -out server.key 2048
 krizna@mail:~$ openssl rsa -in server.key -out server.key.insecure
 krizna@mail:~$ mv server.key server.key.secure
 krizna@mail:~$ mv server.key.insecure server.key
 krizna@mail:~$ openssl req -new -key server.key -out server.csr
 krizna@mail:~$ openssl x509 -req -days 365 -in server.csr -signkey server.key -out server.crt
 krizna@mail:~$ sudo cp server.crt /etc/ssl/certs
 krizna@mail:~$ sudo cp server.key /etc/ssl/private
Step 7 » Now configure certificate path
krizna@mail:~$ sudo postconf -e 'smtpd_tls_key_file = /etc/ssl/private/server.key'
 krizna@mail:~$ sudo postconf -e 'smtpd_tls_cert_file = /etc/ssl/certs/server.crt'
Step 8 » Open /etc/postfix/master.cf file and uncomment below lines to enable smtps ( 465 ) and submission ( 587 ) .
submission inet n       -       -       -       -       smtpd
  -o syslog_name=postfix/submission
  -o smtpd_tls_security_level=encrypt
  -o smtpd_sasl_auth_enable=yes
  -o smtpd_relay_restrictions=permit_sasl_authenticated,reject
  -o milter_macro_daemon_name=ORIGINATING
smtps     inet  n       -       n       -       -       smtpd
  -o syslog_name=postfix/smtps
  -o smtpd_tls_wrappermode=yes
  -o smtpd_sasl_auth_enable=yes
  -o smtpd_relay_restrictions=permit_sasl_authenticated,reject
  -o milter_macro_daemon_name=ORIGINATING
Step 9 » Now install Dovecot SASL by typing the below command.
krizna@mail:~$ sudo apt-get install dovecot-commonIssue the following values for the prompts during installation.
1. yes
2. mail.krizna.com
Step 10 » Make changes to the files as follows.
Open /etc/dovecot/conf.d/10-master.conf file and find # Postfix smtp-auth line ( line no:95 ) and add the below lines .
# Postfix smtp-authOpen /etc/dovecot/conf.d/10-auth.conf file and find (line no:100)
unix_listener /var/spool/postfix/private/auth {
mode = 0660
user = postfix
group = postfix
}
auth_mechanisms = plain and replace auth_mechanisms = plain login
Step 11 » Restart postfix and dovecot services
krizna@mail:~$ sudo service postfix restart
 krizna@mail:~$ sudo service dovecot restart
Step 12 » Now test SMTP-AUTH and smtp/pop3 port access .
Type the below command and should get below response.
krizna@mail:~$ telnet mail.krizna.com smtpnow type ehlo mail.krizna.com and should get below response , please make sure you get those bolded lines .
Trying 127.0.0.1...
Connected to localhost.
Escape character is '^]'.
220 mail.kriznaa.com ESMTP Postfix (Ubuntu)
ehlo mail.krizna.com and try the same with port 587 (telnet mail.krizna.com 587).
250-mail.krizna.com
--------
250-STARTTLS
250-AUTH PLAIN LOGIN
250-AUTH=PLAIN LOGIN
---------
250 DSN
Postfix configuration is over, continue for dovecot installation.
» Installing and configuring dovecot
Step 12 » Install dovecot using the below command
krizna@mail:~$ sudo apt-get install dovecot-imapd dovecot-pop3d
Step 13 » Now configure mailbox. Open /etc/dovecot/conf.d/10-mail.conf file and find (Line no:30 )
mail_location = mbox:~/mail:INBOX=/var/mail/%uReplace with
mail_location = maildir:~/Maildir
Step 14 » Now change pop3_uidl_format . Open /etc/dovecot/conf.d/20-pop3.conf file and find and uncomment the below line ( Line no : 50 )
pop3_uidl_format = %08Xu%08Xv
Step 15 » Now enable SSL . Open /etc/dovecot/conf.d/10-ssl.conf file and find and uncomment the below line ( Line no : 6 )
ssl = yes
Step 16 »Restart dovecot service.
krizna@mail:~$ sudo service dovecot restart
Step 17 » Now test pop3 and imap port access using the telnet command.
krizna@mail:~$ telnet mail.krizna.com 110 Repeat the same for 995,993,143 ports.
Trying 127.0.0.1...
Connected to localhost.
Escape character is '^]'.
+OK Dovecot (Ubuntu) ready.
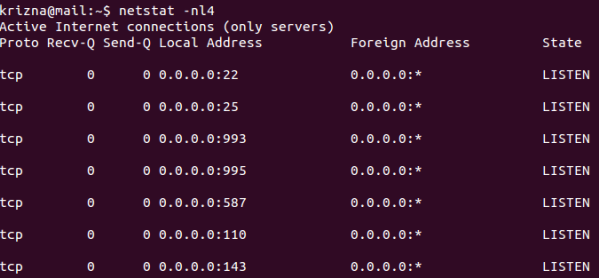
OR check for listening ports using netstat command .
krizna@mail:~$ netstat -nl4 you should get the result like below.
Step 18 » Create some users and check using mail clients like thunderbird or outlook
krizna@mail:~$ sudo useradd -m bobby -s /sbin/nologin
 krizna@mail:~$ sudo passwd bobby
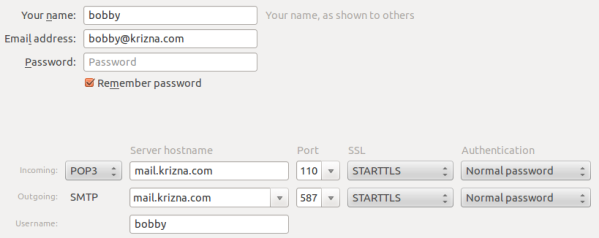
Now mail server is ready, you can send and receive mail using the server. Continue for squirrelmail ..
» Installing and configuring squirrelmail
Step 19 » Install squirrelmail using the below command. This will install apache and PHP packages.
krizna@mail:~$ sudo apt-get install squirrelmail
Step 20 » Configure squirrelmail
krizna@mail:~$ sudo squirrelmail-configureEverything is pre-configured , we just need to change Organization name .
» Press 1 (Organization Preferences) » again press 1 (Organization Name) » Organization Name » Press S » Press Q to quit
Step 19 » Now configure apache to enable squirrelmail .
krizna@mail:~$ sudo cp /etc/squirrelmail/apache.conf /etc/apache2/sites-available/squirrelmail.conf
 krizna@mail:~$ sudo a2ensite squirrelmail
Step 20 » Restart Apache service
krizna@mail:~$ sudo service apache2 restart
Step 21 » Now open http://serverIP/squirrelmail in your browser and login using username (bobby) . you can send and receive mail using squirrelmail.
Okay .. its over now ..
Please note when you decide to move server to the production, it is very important to implement Spam filter and antivirus . please check this post for more detail Postfix spamfilter and antivirus implementation
Also see :
» Setup mail server on centos 7
» Setup mail server on centos 6
I have done all in this tutorial, but the ports used for mail aren’t open.
Update: I forgot to uncomment a line 😉
I have done all in this tutorial, but the ports used for mail aren’t open.
Update: I forgot to uncomment a line 😉
Hi Krizna, I followed your instructions and I’ve got nothing wrong, but
when I try to setup my mail in outlook, it gives me this error “Log onto
incoming mail server (POP3): Your e-mail server rejected your user
name. Verify your user name for this account in Account Settings. The
server responded: -ERR [AUTH] Plaintext authentication disallowed on
non-secure (SSL/TLS) connections.” Please Help. I know I inputted a
right username because i can access my account in squirrel.
Thx for sharing….nice documented
Thx for sharing….nice documented
how to configure sendmail with squirrelmail
how to configure sendmail with squirrelmail
Great tutorial, but I’m having trouble with step 11 (relating to step 5?).
When I enter “sudo service postfix restart” I get this error, twice…
* Starting Postfix Mail Transport Agent postfix
postmulti: fatal: /etc/postfix/main.cf, line 62-61: missing ‘=’ after attribute name: “permit_sasl_authenticated,permit_mynetworks,reject_unauth_destination”
[ OK ]
Any idea why this is happening, and how to fix it?
This is on a fresh install of Xububtu, with nothing else installed yet.
Thanks,
Rick
Ok, I got this working, at least mostly working. Everything seems to be working except that when I go through step 12 Now test SMTP-AUTH and smtp/pop3 port access. The test only completes successfully for port 587, not for the SMTP port (25). Otherwise things seem to be working. Is this OK, or should I try to determine why the SMTP port is not working. Like I said, port 587 tests OK.
Thanks,
Rick
So how did you get rid of that error? .. the “missing ‘=’ after attribute name” one. Must be some silly WHITESPACE issue but I cant get my finger on it.
If you are having trouble on how to connect you account on outlook just follow my instruction :
Setup E-mail manually
create an account in outlook with the same user and password you’ve create in step 18,
user: info
password: *******
in your account information put
your name:
and email address: (ex. your info@example.com)
then in your server information put incoming server the actual public IP address of your hosted mail server. (ex. 10.10.1.15) .
Do the same with outgoing server.
in the “change account form” select more settings.. then in Internet Email Setting, select advanced tab.
then use 995 for incoming server
tick the box for ssl connection
and leave the outgoing SMTP on port (25) and the following encryted connection (NONE)
after that test account setting
and then you’re ready to go.
there two are missing:
250-AUTH PLAIN LOGIN
250-AUTH=PLAIN LOGIN
what should I do
there two are missing:
250-AUTH PLAIN LOGIN
250-AUTH=PLAIN LOGIN
what should I do
I’m getting this error at squirrel mail… What should I do…
Message not sent. Server replied:
Connection refused
111 Can’t open SMTP stream.
I’m getting this error at squirrel mail… What should I do…
Message not sent. Server replied:
Connection refused
111 Can’t open SMTP stream.
Im getting an error(connection smtp server timed out) when trying to setup email client(Thunderbird) but from the command I manage to send a test me message. please help.
Im getting an error(connection smtp server timed out) when trying to setup email client(Thunderbird) but from the command I manage to send a test me message. please help.
well done and beautifully defined. good work and keep it up
well done and beautifully defined. good work and keep it up
i cant receive external mail, cannot receive hotmail emails,
Pleaseeeeeeeeeee help
i cant receive external mail, cannot receive hotmail emails,
Pleaseeeeeeeeeee help
You can review file
/var/log/mail.log
And tell me the error
problem sorted, My IP was not registered with the third party spam filter server.
thanks
I have the same Problem
Can anybody help?
Dear fayyaz, thanks for reply but i have followed all the steps in that link
and double checked but unfortunately couldn’t get the external mails
Dear fayyaz, thanks for reply but i have followed all the steps in that link
and double checked but unfortunately couldn’t get the external mails
What is the expected output for ehlo in port 587? Which lines I’m looking for?
What is the expected output for ehlo in port 587? Which lines I’m looking for?
ehlo 587
250-RemittranceUk
250-PIPELINING
250-SIZE 10240000
250-VRFY
250-ETRN
250-STARTTLS
250-AUTH PLAIN LOGIN
250-AUTH=PLAIN LOGIN
250-ENHANCEDSTATUSCODES
250-8BITMIME
250 DSN
I’m not getting AUTH PLAIN LOGIN and AUTH=PLAIN LOGIN on port 587 but i am getting it on smtp
same, figured it out?
my recommendation to you is to remove the comment mark at the start of the line #submission
Lovely tutorial! Right now I’m having a problem where my e-mails are not being received by dovecot. They never make it to maildir. DNS seems fine. Is there a way to test if dovecot is really working?
ya I am also facing the same problem
Lovely tutorial! Right now I’m having a problem where my e-mails are not being received by dovecot. They never make it to maildir. DNS seems fine. Is there a way to test if dovecot is really working?
ya I am also facing the same problem
same here
Muito bom esse procedimento pra instalacao!! Funcionou 200% sempre precisar reconfigurar nada valeu!!!! Parabens!!!
Muito bom esse procedimento pra instalacao!! Funcionou 200% sempre precisar reconfigurar nada valeu!!!! Parabens!!!
I’ve just realized that’s a blog in English kkkk!!! I meant in my previous comment that this article about Postfix’s installation and configuration was SO useful, it worked out perfectly I didn’t even needed to tweak something after to finish the how-to, great!! Thank you SOO much!!!