Nginx
Nginx is a lightweight webserver which is more stable and secure, it serves static content 50 times faster than Apache. nginx is a perfect load balancer can able to handle more than 7000 live request per second , In the meantime it consumes only less cpu and memory.
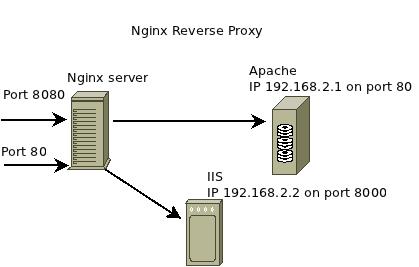
Nginx reverse proxy is very powerful and can be used behind any other webserver ( Apache,IIS etc ).
Here we can see how to install and configure nginx in ubuntu 12.04
» Installing nginx
» Mysql installation
» PHP installation for Nginx
» Nginx configuration and testing
» Nginx Reverse proxy
» SSL enabled
» Installing nginx on Ubuntu 12.04.
Update ubuntu repositories by giving the below command
krizna@leela:~$ sudo apt-get update
Step 1 » Issue the below command for installing nginx package from repository .
krizna@leela:~$ sudo apt-get install nginx
The above command will install nginx along with dependencies.
Step 2 » After installation , let’s start nginx service.
krizna@leela:~$ sudo /etc/init.d/nginx start
Now open the server IP in your browser (Eg: http://192.168.1.1 ). you can see the Nginx welcome page.
» Mysql installation
For mysql installation please refer this page Mysql server installation on ubuntu 12.04
» PHP installation for Nginx
Step 3 » Nginx can process PHP files through php-fpm (FastCGI Process Manager) . Issue the below command to install PHP-FPM
krizna@leela:~$ sudo apt-get install php5-fpm php5-mysql php5-xcache
» Nginx configuration and testing
Step 4 » Now we can test nginx server using simple configuration . Follow the steps one by one
krizna@leela:~$ sudo mkdir /usr/share/nginx/www/test
krizna@leela:~$ cd /usr/share/nginx/www/test
and create index.php file and paste the below code and save it
<?php
phpinfo();
?>
Step 5 » Now create a virtual site
krizna@leela:~$ cd /etc/nginx/sites-available
and create a file called test and paste the below configuration .
 server {
        listen 8080;
        root /usr/share/nginx/www/test;

        location ~ .php$ {
                fastcgi_split_path_info ^(.+.php)(/.+)$;
                fastcgi_pass 127.0.0.1:9000;
                fastcgi_index index.php;
                include fastcgi_params;

         }
}
The above configuration will listen on port 8080 with the root directory path /usr/share/nginx/www/test where we created the index.php file.
Step 6 » Enable the virtual site by issuing the below command
krizna@leela:~$ ln -s /etc/nginx/sites-available/test /etc/nginx/sites-enabled/test
Step 7 » Now restart nginx service
krizna@leela:~$ sudo /etc/init.d/nginx restart
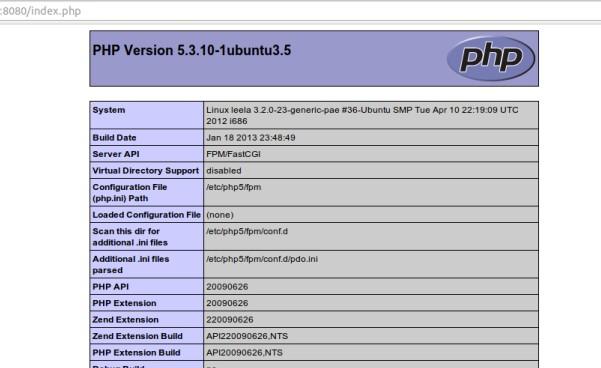
Now open the server IP with port 8080 in your browser ( Eg: http://192.168.1.1:8080 ) . you can see the php info page like below.
» Nginx reverse proxy

Please refer the diagram and the configuration below
upstream apache {
        server 192.168.2.1:80;
}
server {
        listen 8080;
        location / {
        proxy_redirect off;
        proxy_pass http://apache;
        include proxy_params;
        }
}
upstream iis {
        server 192.168.2.2:8000;
}
server {
        listen 80;
        location / {
        proxy_redirect off;
        proxy_pass http://iis;
        include proxy_params;
        }
}
You can create a another virtual site to test this configuration.
» SSL enabled
upstream apache {
        server 192.168.2.1:80;
}
server {
        listen 443;
        ssl on;
        ssl_certificate /etc/nginx/server.crt;
        ssl_certificate_key /etc/nginx/server.key;
        location / {
        proxy_redirect off;
        proxy_pass http://apache;
        include proxy_params;
        }
}
Please note these configurations are only for testing not for live servers .


its a perfect article
its a perfect article
nginx