
Samba is a free software used to enable file and print services on unix-like systems. It runs on most unix variants, such as Linux, AIX, Solaris and BSD.
This article helps you to set up file server on ubuntu 14.04 server. This article contains steps for creating both anonymous ( without username and password ) and secured shares .
1. Anonymous share.
2. Secured share.
3. User creation.
Setup File server on ubuntu 14.04
Step 1 » Install samba packages after updating repositories
krizna@leela:~$ sudo apt-get update
 krizna@leela:~$ sudo apt-get install samba samba-common python-glade2
Creating Anonymous share
Everyone can access and store files without username and password .
Step 2 » Create folder for Anonymous share.
krizna@leela:~$ sudo mkdir -p /shares/anonymous
Step 3 » Change the ownership to nobody so that everyone can access and store files in that folder.
krizna@leela:~$ sudo chown nobody:nogroup /shares/anonymous/
Step 4 » Now define values in samba configuration to share /shares/anonymous/ folder. /etc/samba/smb.conf is the main configurion file for samba .
Take a backup before editing that file .
krizna@leela:~$ sudo cp /etc/samba/smb.conf /etc/samba/smb.conf.orgnow add the below code at the end of the file to enable share.
krizna@leela:~$ sudo vim /etc/samba/smb.conf
[Anonymous]
       comment = Anonymous share access
       path = /shares/anonymous
       browsable = yes
       writable = yes
       guest ok = yes
       read only = no
       force user = nobody
       force group = nogroup
Step 5 » Now restart smbd service .
krizna@leela:~$ sudo service smbd restart
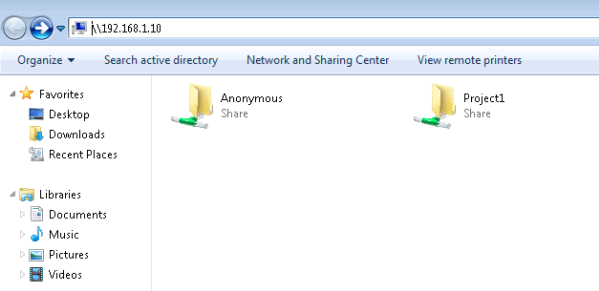
After restarting service . Try to access share from windows client (Goto -> RUN -> \serverIP ) . you could access anonymous share folder without username and password, try to create or copy files to that folder.
Creating secured share
Secured shares can be accessed using username and password .Here for example, I’m going to create share project1.
Step 6 » Create a folder for share .
krizna@leela:~$ sudo mkdir -p /shares/project1
Step 7 » Create a new group smbproj1,so that Users added to this group can access project1 share.
krizna@leela:~$ sudo addgroup smbproj1
Step 8 » Modify ownership and permission for the folder.
krizna@leela:~$ sudo chown root:smbproj1 /shares/project1/
 krizna@leela:~$ sudo chmod 770 /shares/project1/
Step 9 » Now define values in the configuration file .
krizna@leela:~$ sudo vim /etc/samba/smb.conf
[Project1]
         comment = Project1 Share
         path = /shares/project1
         valid users = @smbproj1
         guest ok = no
         writable = yes
         browsable = yes
Step 10 » Now restart smbd service .
krizna@leela:~$ sudo service smbd restartAfter restarting service, you could see Project1 share . Additional secured shares can be created in the same way.
User creation
Add new user john for accessing project1 share
Step 11 » Create a user john .
krizna@leela:~$ sudo useradd john -s /usr/sbin/nologin -G smbproj1 -s /usr/sbin/nologin : Restricting shell access
-G smbproj1 : Added to smbproj1 group
Step 12 » Create samba password for user john
krizna@leela:~$ sudo smbpasswd -a john
Now user john can access Project1 share. Additional users can be added in the same way.
For existing users use usermod command to add user in smbproj1 group and create samba password using smbpasswd.
krizna@leela:~$ sudo usermod mike -G smbproj1
For accessing multiple shares. Example: dave has access to multiple project groups like smbproj1 and smbproj2.
krizna@leela:~$ sudo usermod dave -G smbproj1,smbproj2
For troubleshooting, Use testparm command
For more info Samba file server guide
That’s it. Have a nice day.
Also see:
Setup file server on centos 7 – Step by step
thanks, it’s work and now we share our projects in our company
thanks, it’s work and now we share our projects in our company
thanks
WOW. A very well written article! I had a file server up and running in about 1/2 an hour. Awesome. Thank You!
simple and to the point… nice…
thank mr very goot extreme goodly worker for my compani now we can watch furries together thank guy!
i used this tutorial as a basis to setup my file server had to figure some other stuff out as i have 3 1tb hdd’s installed and wanted to have folders on each drive shared worked well. had an issue with permissions but that was because i forgot the @ symbol in the smb.conf for the valid users.