
VNC server is used to share graphical desktop which can be controlled from other computers . This guide is helpful to install VNC server on Ubuntu Desktop 14.04, Ubuntu server 14.04 and Ubuntu cloud 14.04 .
Basically ubuntu server and ubuntu cloud editions does not contains GUI, which needs to be installed before installing VNC server. Please note that server and cloud editions are carefully designed to utilize less hardware resources ( minimal environment ), installing GUI might leads to high hardware utilization.
Install gui on ubuntu server 14.04
Issue the below command to install GUI on server and cloud editions.
krizna@leela:~$ sudo apt-get install --no-install-recommends ubuntu-desktopUse –no-install-recommends key to keep GUI minimal. this will skip extra tools and apps and will install only basic desktop environment with few supported tools . Ubuntu desktop users can skip this command .
Install VNC server on ubuntu 14.04
Step 1 » Start installing below gnome packages which helps VNC to load properly . These packages are required for all editions including ubuntu desktop .
krizna@leela:~$ sudo apt-get install gnome-panel gnome-settings-daemon metacity nautilus gnome-terminal
Step 2 » Now install vnc4server package.
krizna@leela:~$ sudo apt-get install vnc4server
Step 3 » Open /usr/bin/vncserver file and edit as follows . Before editing, make a backup copy.
krizna@leela:~$ sudo cp /usr/bin/vncserver /usr/bin/vncserver.bkp
krizna@leela:~$ sudo nano /usr/bin/vncserverFind this line ( Line no:57 )
"# exec /etc/X11/xinit/xinitrcnn". and add these lines like below
    "# exec /etc/X11/xinit/xinitrcnn".
       "gnome-panel &n".
       "gnome-settings-daemon &n".
       "metacity &n".
       "nautilus &n".
       "gnome-terminal &n".
Step 4 » Now type the command vncserver to start VNC session. you will be prompted for creating new vnc password.
krizna@leela:~$ vncserver
 You will require a password to access your desktops.
 Password:******
 Verify:******
 xauth:  file /home/boby/.Xauthority does not exist
 New 'leela:1 (krizna)' desktop is leela:1
 Creating default startup script /home/krizna/.vnc/xstartup
 Starting applications specified in /home/krizna/.vnc/xstartup
 Log file is /home/krizna/.vnc/leela:1.log
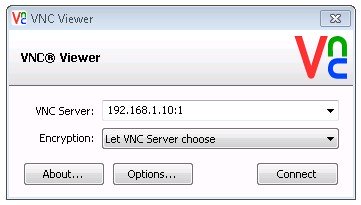
Step 5 » Now you can view your remote desktop using IP address and port ( Eg : 192.168.1.10:1 ).
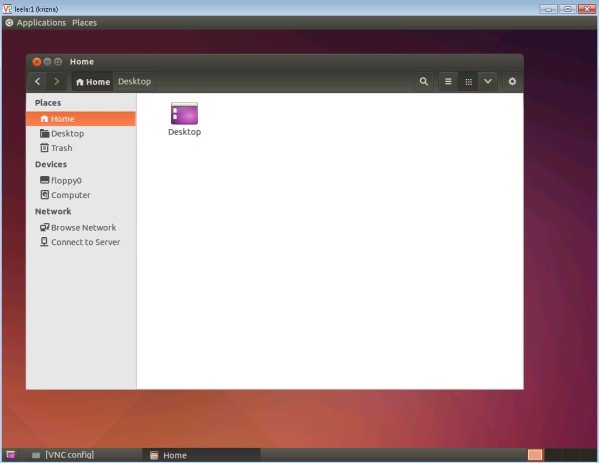
That’s it, your VNC server is working.
VNC server as service
Just like centos and other flavours , you can run VNC server as service in ubuntu.
This is very helpful, as it automatically starts vnc sessions when restarting the server.
Step 6 » Create a file vncserver in /etc/init.d/ directory
krizna@leela:~$ sudo nano /etc/init.d/vncserver and add the below code .
#!/bin/bash
### BEGIN INIT INFO
# Provides:          VNCSERVER
# Required-Start:    $remote_fs $syslog
# Required-Stop:     $remote_fs $syslog
# Default-Start:     2 3 4 5
# Default-Stop:      0 1 6
# Short-Description: Start daemon at boot time
# Description:       Enable service provided by daemon.
### END INIT INFO
unset VNCSERVERARGS
VNCSERVERS=""
[ -f /etc/vncservers.conf ] && . /etc/vncservers.conf
prog=$"VNC server"
start() {
 . /lib/lsb/init-functions
 REQ_USER=$2
 echo -n $"Starting $prog: "
 ulimit -S -c 0 >/dev/null 2>&1
 RETVAL=0
 for display in ${VNCSERVERS}
 do
 export USER="${display##*:}"
 if test -z "${REQ_USER}" -o "${REQ_USER}" == ${USER} ; then
 echo -n "${display} "
 unset BASH_ENV ENV
 DISP="${display%%:*}"
 export VNCUSERARGS="${VNCSERVERARGS[${DISP}]}"
 su ${USER} -c "cd ~${USER} && [ -f .vnc/passwd ] && vncserver :${DISP} ${VNCUSERARGS}"
 fi
 done
}
stop() {
 . /lib/lsb/init-functions
 REQ_USER=$2
 echo -n $"Shutting down VNCServer: "
 for display in ${VNCSERVERS}
 do
 export USER="${display##*:}"
 if test -z "${REQ_USER}" -o "${REQ_USER}" == ${USER} ; then
 echo -n "${display} "
 unset BASH_ENV ENV
 export USER="${display##*:}"
 su ${USER} -c "vncserver -kill :${display%%:*}" >/dev/null 2>&1
 fi
 done
 echo -e "n"
 echo "VNCServer Stopped"
}
case "$1" in
start)
start $@
;;
stop)
stop $@
;;
restart|reload)
stop $@
sleep 3
start $@
;;
condrestart)
if [ -f /var/lock/subsys/vncserver ]; then
stop $@
sleep 3
start $@
fi
;;
status)
status Xvnc
;;
*)
echo $"Usage: $0 {start|stop|restart|condrestart|status}"
exit 1
esac
Step 7 » Modify execute permission for the file.
krizna@leela:~$ sudo chmod +x /etc/init.d/vncserver
Step 8 » Create vncservers.conf file in /etc/ directory as stated in service code.
krizna@leela:~$ sudo nano /etc/vncservers.confand add the below lines for starting vnc session for the user krizna.
VNCSERVERS="1:krizna"
VNCSERVERARGS[1]="-geometry 1024x768"
For additional vnc users.
Login into the user
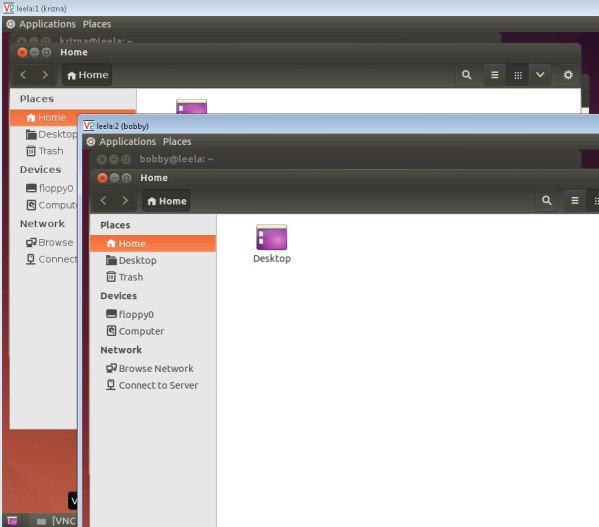
krizna@leela:~$ su - bobbyCreate VNC password by the below command . vncserver command ( step 4) is not required when starting as service .
bobby@leela:~$ vncpasswdAdd user to the file.
Password:
Verify:
VNCSERVERS="1:krizna 2:bobby"
VNCSERVERARGS[1]="-geometry 1024x768"
VNCSERVERARGS[2]="-geometry 1024x768"
Now user krizna can be accessed using serverip:1 ( 192.168.1.10:1 )and bobby using serverip:2 ( 192.168.1.10:2 ).
Step 9 » Issue the below command to add vncserver service to default runlevels.
krizna@leela:~$ sudo update-rc.d vncserver defaults
Step 10 » Now start/restart the service.
krizna@leela:~$ sudo /etc/init.d/vncserver start[or]
krizna@leela:~$ sudo /etc/init.d/vncserver restart
All the best.
Also see :
» Enable remote desktop ubuntu 16.04
» How to install Anydesk on ubuntu 20.04
» How to install google chrome on ubuntu 20.04
Thanks my friend , everything worked as expected, except some keys ( like “s” ) instead of showing the letter open the start menu.
Thanks my friend , everything worked as expected, except some keys ( like “s” ) instead of showing the letter open the start menu.
useless
🙁 ???
Useful. I just installed it. Worked first time, no problems. Maybe you don’t (know) what “useless” means?
Hi krizna,
I can’t seem to find the line of code “# exec /etc/X11/xinit/xinitrcnn” when looking through the /usr/ directory. Any tips on how to locate this?
Thanks!
Look in /usr/bin/vnc4server instead
Hey Ctrl+W in the nano editor will let you search for strings just copy and paste.
Hey dude I wish I found this 8 hours ago. Much love and respect.
Good job. The best solution in the network 🙂 I have one problem, when I click the section network then gets an error: can not open location, the same error on section computer :/
Great was able to connect but but nothing worked. seem to have sorted it but am still getting ETIMEDOUT error?
Thanks for this guide !
Worked the first time, best instructions I have found to setup Ubuntu 14.04
Thanx
Cannot find this line
krizna@leela:~$ sudo nano /usr/bin/vncserver
Find this line ( Line no:57 )
“# exec /etc/X11/xinit/xinitrcnn”.and add these lines like below
“# exec /etc/X11/xinit/xinitrcnn”.
“gnome-panel &n”.
“gnome-settings-daemon &n”.
“metacity &n”.
“nautilus &n”.
“gnome-terminal &n”.
Really good tutorial. After 24hours. I`am not able to login through any vnc viewer. It shows authentication failed or failed to data to socket.
Great tutorial. Seamlessly worked me.
Who ever fixed this tutorial so it installs again THANK YOU! you’re awesome.
this is the best install for VPS desktop.
didnt work for me in ubuntu desktop 14.04 lts, i will try with ubuntu server
didnt appear the menu option
the same problem with ubuntu-server
the vnc service isn`t starting after reboot only if I start it manually 🙁 any ideea why ?
Everything worked for me but when i login to VNC all i get is root terminal in desktop environment any idea’s ?
Can’t open gnome-control-center
(gnome-control-center.real:29074): Gdk-ERROR **: The program ‘gnome-control-center.real’ received an X Window System error.
This probably reflects a bug in the program.
The error was ‘BadRequest (invalid request code or no such operation)’.
(Details: serial 135 error_code 1 request_code 149 (RANDR) minor_code 8)
(Note to programmers: normally, X errors are reported asynchronously;
that is, you will receive the error a while after causing it.
To debug your program, run it with the GDK_SYNCHRONIZE environment
variable to change this behavior. You can then get a meaningful
backtrace from your debugger if you break on the gdk_x_error() function.)
Trace/breakpoint trap (core dumped)
For such “bloggers” user must have a good backup system. rsnapshot etc.