
FTP is used to transfer files from one host to another over TCP network. This article explains how to setup FTP server on ubuntu 14.04 .
There are 3 popular FTP server packages available PureFTPD, VsFTPD and ProFTPD. Here i’ve used VsFTPD which is lightweight and less Vulnerability.
Setup FTP server on Ubuntu 14.04
Step 1 » Update repositories .
krizna@leela:~$ sudo apt-get update
Step 2 » Install VsFTPD package using the below command.
krizna@leela:~$ sudo apt-get install vsftpd
Step 3 » After installation open /etc/vsftpd.conf file and make changes as follows.
Uncomment the below lines (line no:29 and 33).
write_enable=YES» Uncomment the below line (line no: 120 ) to prevent access to the other folders outside the Home directory.
local_umask=022
chroot_local_user=YES and add the following line at the end.
allow_writeable_chroot=YES» Add the following lines to enable passive mode.
pasv_enable=Yes
 pasv_min_port=40000
 pasv_max_port=40100
Step 4 » Restart vsftpd service using the below command.
krizna@leela:~$ sudo service vsftpd restart
Step 5 » Now ftp server will listen on port 21. Create user with the below command.Use /usr/sbin/nologin shell to prevent access to the bash shell for the ftp users .
krizna@leela:~$ sudo useradd -m john -s /usr/sbin/nologin
 krizna@leela:~$ sudo passwd john
Step 6 » Allow login access for nologin shell . Open /etc/shells and add the following line at the end.
/usr/sbin/nologin
Now try to connect this ftp server with the username on port 21 using winscp or filezilla client and make sure that user cannot access the other folders outside the home directory.
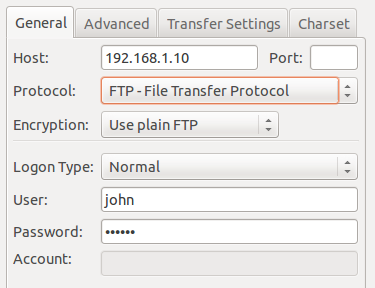
Please note using ftp on port 21 is a big security risk . it’s highly recommended to use SFTP. Please continue for SFTP configuration
Secure FTP ( SFTP )
SFTP is called as “Secure FTP” which generally use SSH File Transfer Protocol . so we need openssh-server package installed , Issue the below command if it’s not already installed.
krizna@leela:~$ sudo apt-get install openssh-server
Step 7 » Create a new group ftpaccess for FTP users.
krizna@leela:~$ sudo groupadd ftpaccess
Step 8 » Now make changes in this /etc/ssh/sshd_config file.
» Find and comment the below line
Subsystem sftp /usr/lib/openssh/sftp-server and Add these lines at the end of the file.
Subsystem sftp internal-sftp
 Match group ftpaccess
 ChrootDirectory %h
 X11Forwarding no
 AllowTcpForwarding no
 ForceCommand internal-sftp
Step 9 » Restart sshd service.
krizna@leela:~$ sudo service ssh restart
Step 10 » The below steps must be followed while creating Users for sftp access.
Create user john with ftpaccess group and /usr/bin/nologin shell.
krizna@leela:~$ sudo useradd -m john -g ftpaccess -s /usr/sbin/nologinChange ownership for the home directory.
krizna@leela:~$ sudo passwd john
krizna@leela:~$ sudo chown root /home/johnCreate a folder inside home directory for writing and change ownership of that folder.
krizna@leela:~$ sudo mkdir /home/john/www
 krizna@leela:~$ sudo chown john:ftpaccess /home/john/www
Now try to connect server using SFTP ( port : 22 ) and makesure Users can upload files to www directory and cannot access other folders outside home directory.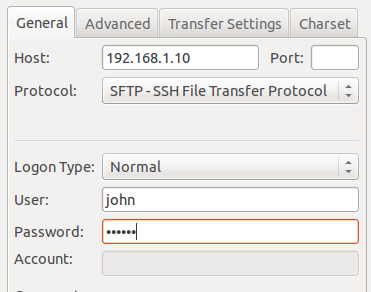
If you want use both FTP and SFTP together, please perform above steps ( Step 10 ) while creating users . For existing users, move them to ftpaccess group and create folder structure and ownership changes as below.
krizna@leela:~$ sudo usermod john -g ftpaccess -s /usr/sbin/nologin
 krizna@leela:~$ sudo chown root /home/john
 krizna@leela:~$ sudo mkdir /home/john/www
 krizna@leela:~$ sudo chown john:ftpaccess /home/john/www
Now john can able to upload files to www folder using FTP as well as SFTP.
Also see :
» Setup FTP server on ubuntu 16.04
» Setup FTP server on centos 7
» Configure ftp server on centos 6
All the best.
Good one! Thanks to you created SFTP. Thank mate.
Good one! Thanks to you created SFTP. Thank mate.
Thank you for this information. Very useful.
Thank you for this information. Very useful.
hi how to config instead in the home/ it should be in /var/www directly after sftp login
thanks
Use -d while creating usernames
sudo useradd -m -d /var/www/john john -g ftpaccess -s /usr/sbin/nologin
hi how to config instead in the home/ it should be in /var/www directly after sftp login
thanks
Use -d while creating usernames
sudo useradd -m -d /var/www/john john -g ftpaccess -s /usr/sbin/nologin
HI, I have tried with a particular folder so on login the user is directly going to that folder but the user can go back to the root and go into any other folder and add delete files so the whole purpose of limited access to a particular folder is defeated. Any inputs will be highly apreciated
HI, I have tried with a particular folder so on login the user is directly going to that folder but the user can go back to the root and go into any other folder and add delete files so the whole purpose of limited access to a particular folder is defeated. Any inputs will be highly apreciated
Hi, I’m getting a ‘553 Could not create file’ response. I’m using port 21 (for now). Any thoughts? Thanks
Delete also fails (550 Delete operation failed). Guessing permissions?
Hi, I’m getting a ‘553 Could not create file’ response. I’m using port 21 (for now). Any thoughts? Thanks
Delete also fails (550 Delete operation failed). Guessing permissions?
Hi, looks like the default config has changed since this was written, I don’t see the usePAM line, there’s pam_service and some rsa info
Hi, looks like the default config has changed since this was written, I don’t see the usePAM line, there’s pam_service and some rsa info
Everything is working correctly!
Thanks for this guide!
However I suggest that you add a tiny commend on SFTP,
** If you already created the user john and the group ftpaccess you just simply have to put john inside ftpaccess
sudo usermod -g ftpaccess john
All the best
Everything is working correctly!
Thanks for this guide!
However I suggest that you add a tiny commend on SFTP,
** If you already created the user john and the group ftpaccess you just simply have to put john inside ftpaccess
sudo usermod -g ftpaccess john
All the best
I tried to follow this step by step on my AWS Ubuntu instance. But it didnt work. And now I am unable to login into my instance using my key pair. Any ideas? I tried to debug it using key pair permission issue but nothing worked so far
Make sure you enable the ports on the instance security group settings (21) and (40000-41000).
I tried to follow this step by step on my AWS Ubuntu instance. But it didnt work. And now I am unable to login into my instance using my key pair. Any ideas? I tried to debug it using key pair permission issue but nothing worked so far. Even FTP doesnt work for the user I created. It gives me the error “Could not connect Server”
Make sure you enable the ports on the instance security group settings (21) and (40000-41000).
It won’t work if your max port is lower than your min port. Change the passive ports in vsftpd.conf to:
pasv_max_port=40000
pasv_min_port=40100
Thanks jordan
It won’t work if your max port is lower than your min port. Change the passive ports in vsftpd.conf to:
pasv_max_port=40100
pasv_min_port=40000
And you might need to enable these ports on your server’s firewall.
Thanks jordan
Really helpful tutorial, cheers.
One thing that bugged me after following your guide was that the Message of the Day was missing after SSHing onto my servers. This is due to commenting out the “UsePAM yes” within /etc/ssh/sshd_config.
You can’t uncomment this as it is, as the config file will error and SSH won’t start. This option has to come before the Subsystem definition, so at Step 8, if you move the suggested changes to the bottom of the file and leave UsePAM as it is, things will work as expected and you’ll still get the MOTD displaying.
I was setting this up on an AWS EC2 instance, so I had to add the following 2 lines to /etc/vsftpd.conf at Step 3.
pasv_address=[public DNS from the EC2 instance]
pasv_addr_resolve=Yes
the Step-8-at-the-bottom was very useful, thanks 😉
hi,
it didnot work on me, i start configuring from sftp, i did everything but whenever i try to connect it says Network Error: Computer refused connection. any idea?
same problem.
Hi sir thnx Is Work Great
I have problem with Port 80 Closed
Wow! Thank you SIR! Your article provides an excellent guide for setting up an Ubuntu FTP/SFTP server.
Be warned, if you do this, you will lose the ability to access your server via regular SSH for CLI access!
Thank you – is there a way to reenable this? This article is like stepping on a landmine!
Yeah .. i cannot connect wia SSH now… is there a way to fix it? read the comment a minute too late..
Did you ever fix this?
Could you explain the reason please?
Any fixer?
Same mistake here. Did you find a solution? Restart the server, maybe?
You need to remove the user from the ftpaccess group and place them into another group. I placed my account back into the user group using:
usermod -g users “user name”
that should free you
Try using the “LESS SAFE” option of
sudo usermod -a -G ftpaccess -s /bin/bash john
instead of
sudo useradd -m john -g ftpaccess -s /usr/sbin/nologin
This happens, if you missed “Find and comment the below line”.
Yeah , IT WILL HAPPEN WHEN YOU MAKE CHANGES IN /etc/ssh/ssh_config INSTEAD OF /etc/ssh/sshd_config . I have done the same mistake in the beginning .
Hi, sorry if is my question stupid, I am new in Linux.
I log as root in terminal (using “sudo -i”) and then I tried to modify “/etc/vsftpd.conf” but I only got message -bash: /etc/vsftpd.conf: Access denied …If I am root I would do anything, isn´t it?
PS: sorry for my english too
sudo nautilis /etc/vsftpd.conf
and open with you password
thanks a lot it works 110% perfect.guys please take not on the ” eth0 ” interface at the end of “route add default gw 192.168.1.1 eth0” step when assigning a temporary IP addresses cause if you don’t it wont work #thats the mistake that l was doing all along and l could connect to the net
1. create snapshot / backup if youre using vps/remote server 😀