VNC server is used to share graphical desktop which can be controlled from other computers . This guide is helpful to install VNC server on Ubuntu Desktop 14.04, Ubuntu server 14.04 and Ubuntu cloud 14.04 .
Basically ubuntu server and ubuntu cloud editions does not contains GUI, which needs to be installed before installing VNC server. Please note that server and cloud editions are carefully designed to utilize less hardware resources ( minimal environment ), installing GUI might leads to high hardware utilization.
Issue the below command to install GUI on server and cloud editions.krizna@leela:~$ sudo apt-get install --no-install-recommends ubuntu-desktopUse –no-install-recommends key to keep GUI minimal. this will skip extra tools and apps and will install only basic desktop environment with few supported tools . Ubuntu desktop users can skip this command .
Step 1 » Start installing below gnome packages which helps VNC to load properly . These packages are required for all editions including ubuntu desktop .krizna@leela:~$ sudo apt-get install gnome-panel gnome-settings-daemon metacity nautilus gnome-terminal
Step 2 » Now install vnc4server package.krizna@leela:~$ sudo apt-get install vnc4server
Step 3 » Open /usr/bin/vncserver file and edit as follows . Before editing, make a backup copy.krizna@leela:~$ sudo cp /usr/bin/vncserver /usr/bin/vncserver.bkpkrizna@leela:~$ sudo nano /usr/bin/vncserverFind this line ( Line no:57 )"# exec /etc/X11/xinit/xinitrcnn". and add these lines like below
    "# exec /etc/X11/xinit/xinitrcnn".
       "gnome-panel &n".
       "gnome-settings-daemon &n".
       "metacity &n".
       "nautilus &n".
       "gnome-terminal &n".
Step 4 » Now type the command vncserver to start VNC session. you will be prompted for creating new vnc password.krizna@leela:~$ vncserver
You will require a password to access your desktops.
Password:******
Verify:******
xauth: file /home/boby/.Xauthority does not exist
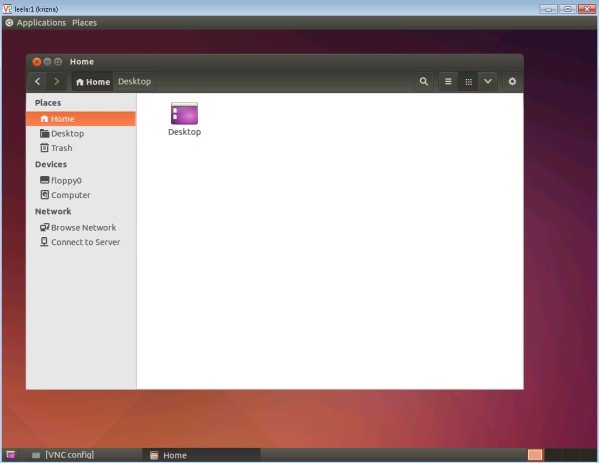
New 'leela:1 (krizna)' desktop is leela:1
Creating default startup script /home/krizna/.vnc/xstartup
Starting applications specified in /home/krizna/.vnc/xstartup
Log file is /home/krizna/.vnc/leela:1.log
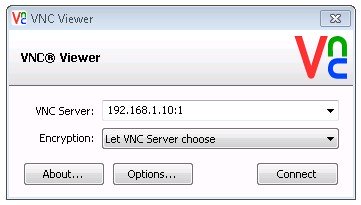
Step 5 » Now you can view your remote desktop using IP address and port ( Eg : 192.168.1.10:1 ).
That’s it, your VNC server is working.
Just like centos and other flavours , you can run VNC server as service in ubuntu.
This is very helpful, as it automatically starts vnc sessions when restarting the server.
Step 6 » Create a file vncserver in /etc/init.d/ directorykrizna@leela:~$ sudo nano /etc/init.d/vncserver and add the below code .
#!/bin/bash
### BEGIN INIT INFO
# Provides:          VNCSERVER
# Required-Start:    $remote_fs $syslog
# Required-Stop:     $remote_fs $syslog
# Default-Start:     2 3 4 5
# Default-Stop:      0 1 6
# Short-Description: Start daemon at boot time
# Description:       Enable service provided by daemon.
### END INIT INFO
unset VNCSERVERARGS
VNCSERVERS=""
[ -f /etc/vncservers.conf ] && . /etc/vncservers.conf
prog=$"VNC server"
start() {
 . /lib/lsb/init-functions
 REQ_USER=$2
 echo -n $"Starting $prog: "
 ulimit -S -c 0 >/dev/null 2>&1
 RETVAL=0
 for display in ${VNCSERVERS}
 do
 export USER="${display##*:}"
 if test -z "${REQ_USER}" -o "${REQ_USER}" == ${USER} ; then
 echo -n "${display} "
 unset BASH_ENV ENV
 DISP="${display%%:*}"
 export VNCUSERARGS="${VNCSERVERARGS[${DISP}]}"
 su ${USER} -c "cd ~${USER} && [ -f .vnc/passwd ] && vncserver :${DISP} ${VNCUSERARGS}"
 fi
 done
}
stop() {
 . /lib/lsb/init-functions
 REQ_USER=$2
 echo -n $"Shutting down VNCServer: "
 for display in ${VNCSERVERS}
 do
 export USER="${display##*:}"
 if test -z "${REQ_USER}" -o "${REQ_USER}" == ${USER} ; then
 echo -n "${display} "
 unset BASH_ENV ENV
 export USER="${display##*:}"
 su ${USER} -c "vncserver -kill :${display%%:*}" >/dev/null 2>&1
 fi
 done
 echo -e "n"
 echo "VNCServer Stopped"
}
case "$1" in
start)
start $@
;;
stop)
stop $@
;;
restart|reload)
stop $@
sleep 3
start $@
;;
condrestart)
if [ -f /var/lock/subsys/vncserver ]; then
stop $@
sleep 3
start $@
fi
;;
status)
status Xvnc
;;
*)
echo $"Usage: $0 {start|stop|restart|condrestart|status}"
exit 1
esac
Step 7 » Modify execute permission for the file.krizna@leela:~$ sudo chmod +x /etc/init.d/vncserver
Step 8 » Create vncservers.conf file in /etc/ directory as stated in service code.krizna@leela:~$ sudo nano /etc/vncservers.confand add the below lines for starting vnc session for the user krizna.
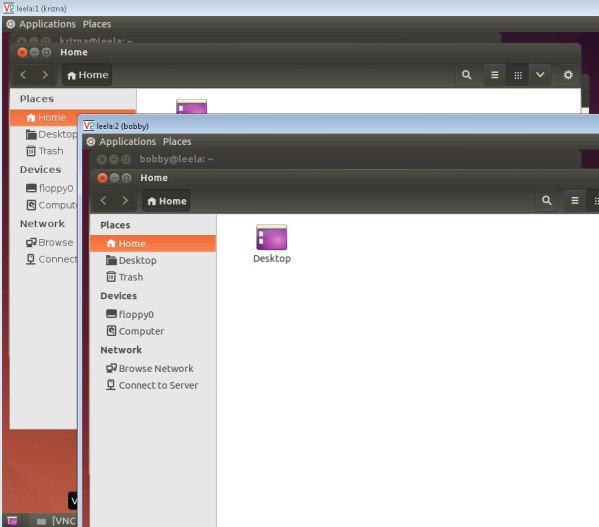
VNCSERVERS="1:krizna"
VNCSERVERARGS[1]="-geometry 1024x768"
For additional vnc users.
Login into the userkrizna@leela:~$ su - bobbyCreate VNC password by the below command . vncserver command ( step 4) is not required when starting as service .bobby@leela:~$ vncpasswdAdd user to the file.
Password:
Verify:
VNCSERVERS="1:krizna 2:bobby"
VNCSERVERARGS[1]="-geometry 1024x768"
VNCSERVERARGS[2]="-geometry 1024x768"
Now user krizna can be accessed using serverip:1 ( 192.168.1.10:1 )and bobby using serverip:2 ( 192.168.1.10:2 ).
Step 9 » Issue the below command to add vncserver service to default runlevels.krizna@leela:~$ sudo update-rc.d vncserver defaults
Step 10 » Now start/restart the service.krizna@leela:~$ sudo /etc/init.d/vncserver start[or]krizna@leela:~$ sudo /etc/init.d/vncserver restart
All the best.
Also see :
» Enable remote desktop ubuntu 16.04
» How to install Anydesk on ubuntu 20.04
» How to install google chrome on ubuntu 20.04
Visual Studio Code is a popular code editor which is lightweight and cross platform application.…
MySQL workbench is a GUI tool for managing MySQL database system. It is used by…
Android Studio is a popular development software used especially for developing android applications. It is…
Google chrome is a most popular web browser developed by google. It was developed to…
Zoom is a popular video conferencing software. It is commonly used for conducting online meetings,…
TeamViewer is a popular application for desktop sharing and remote control. It is available for…