After installing Centos 7, You may not able to connect network in that machine. This will happen because Ethernet interfaces are not enabled by default.This guide will help you to setup network on centos 7 .
This guide contains network configuration steps both in GUI and command mode.
let’s start, Type “nmcli d” command in your terminal for quick identification of Ethernet cards installed in your machine.
Here we have 2 interfaces named “enp0s17” and “enp0s18” . it might be different in your case ( Eg: em1 or p4p1 ).
Recommended for beginners
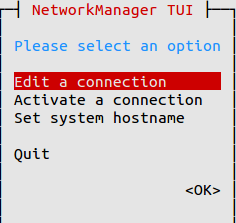
Step 1 » Type this command “nmtui” to open Network manager and press enter after choosing ” Edit a connection” ( Use TAB for choosing options ) .
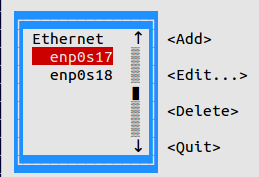
Step 2 » Now you can see all network interfaces, choose one and click “Edit“.
Step 3 » For DHCP,
1. Choose “Automatic” in IPv4 CONFIGURATION.
2. Choose Automatic Connect check box.
3. Press OK and quit Network manager.
Now Restart network service by typing below command.systemctl restart network Now your server will get IP Address from DHCP .
Step 4 » For manual IP address,
1. Choose “Manual” in IPv4 CONFIGURATION.
2. Add IP Address with Subnet , Gateway and DNS server ( Refer below image ).
3. Choose Automatic Connect check box.
4. Press OK and quit Network manager.
Now Restart network service by typing below command.systemctl restart network That’s it, Interface will have static IP.
Step 1 » Network interface config files are located in /etc/sysconfig/network-scripts/ directory. Open ifcfg-enp0s17 file ( For interface enp0s17 ) and you can see the content like below.[root@krizna ~]# vi /etc/sysconfig/network-scripts/ifcfg-enp0s17
TYPE=Ethernet
BOOTPROTO=none
DEFROUTE=yes
IPV4_FAILURE_FATAL=no
IPV6INIT=yes
IPV6_AUTOCONF=yes
IPV6_DEFROUTE=yes
IPV6_FAILURE_FATAL=no
NAME=enp0s17
UUID=7f1aff2d-b154-4436-9497-e3a4dedddcef
ONBOOT=no
HWADDR=00:0C:29:A1:B5:D6
PEERDNS=yes
PEERROUTES=yes
IPV6_PEERDNS=yes
IPV6_PEERROUTES=yes
Step 2 » For DHCP
Find the below lines in config File.BOOTPROTO=none and replace with
ONBOOT=noBOOTPROTO=dhcpNow Restart network service by typing below command.
ONBOOT=yessystemctl restart network Now your server will get IP Address from DHCP
Step 3 » For Static IP.
Find the below lines in config File.BOOTPROTO=none and replace with
ONBOOT=noBOOTPROTO=static And add the below lines at the end of the file.
ONBOOT=yesIPADDR=172.27.0.32File will look like below after changes.
NETMASK=255.255.255.0
GATEWAY=172.27.0.1
DNS1=172.27.0.5TYPE=Ethernet
BOOTPROTO=static
DEFROUTE=yes
IPV4_FAILURE_FATAL=no
IPV6INIT=yes
IPV6_AUTOCONF=yes
IPV6_DEFROUTE=yes
IPV6_FAILURE_FATAL=no
NAME=enp0s17
UUID=f0c5b37d-299a-43cb-b74b-618bb252d129
ONBOOT=yes
HWADDR=00:0C:29:A1:B5:CC
IPV6_PEERDNS=yes
IPV6_PEERROUTES=yes
IPADDR=192.168.1.10
NETMASK=255.255.255.0
GATEWAY=192.168.1.1
DNS1=192.168.1.5
Now Restart network service by typing below command.systemctl restart networkNow Interface will have static IP.
Additionally you can use /etc/sysconfig/network file for hostname and DNS .HOSTNAME=server.krizna.com
DNS1=192.168.1.5
DNS2=8.8.8.8
SEARCH=krizna.com
Have a nice day
Also See
Configure a static IP address on RHEL 8 and Centos 8 .
Setup network on ubuntu 18.04
Visual Studio Code is a popular code editor which is lightweight and cross platform application.…
MySQL workbench is a GUI tool for managing MySQL database system. It is used by…
Android Studio is a popular development software used especially for developing android applications. It is…
Google chrome is a most popular web browser developed by google. It was developed to…
Zoom is a popular video conferencing software. It is commonly used for conducting online meetings,…
TeamViewer is a popular application for desktop sharing and remote control. It is available for…