This article helps you to install and configure basic mail server on Centos 7. Here i have used Postfix for SMTP, Dovecot for POP/IMAP and Dovecot SASL for SMTP AUTH.
Before proceeding please make sure you have assigned static IP for the server and have internet connectivity for installing packages.
1. Installing packages
2. Postfix configuration
3. Dovecot configuration
4. User creation
Step 1 » Assign hostname for the server using the below command.[root@krizna ~]# hostnamectl set-hostname mail.krizna.com
Step 2 » Make a host entry with your IP in /etc/hosts file.172.27.0.51 mail.krizna.com
Step 3 » Now start installing packages.[root@krizna ~]# yum -y install postfix dovecot
After package installation continue with postfix configuration.
First create SSL certificate for encryption.
Step 4 » Follow the below steps one by one for creation.[root@mail ~]# mkdir /etc/postfix/sslLeave blank for A challenge password [] value in the below step.
[root@mail ~]# cd /etc/postfix/ssl
[root@krizna ssl]# openssl genrsa -des3 -out server.key 2048
[root@krizna ssl]# openssl rsa -in server.key -out server.key.insecure
[root@krizna ssl]# mv server.key server.key.secure
[root@krizna ssl]# mv server.key.insecure server.key[root@krizna ssl]# openssl req -new -key server.key -out server.csr
[root@krizna ssl]# openssl x509 -req -days 365 -in server.csr -signkey server.key -out server.crt
Step 5 » Now open /etc/postfix/main.cf file for changes.
Find and uncomment the below lines.#inet_interfaces = localhost #---> line no 116
#mydestination = $myhostname, localhost.$mydomain, localhost #--> line no 164
and add below lines at the end of the file. change myhostname and mydomain values with yours and home_mailbox value to your desired directory. Here it will store mails in the users home directory (Eg: /home/john/mail ).
myhostname = mail.krizna.com
mydomain = krizna.com
myorigin = $mydomain
home_mailbox = mail/
mynetworks = 127.0.0.0/8
inet_interfaces = all
mydestination = $myhostname, localhost.$mydomain, localhost, $mydomain
smtpd_sasl_type = dovecot
smtpd_sasl_path = private/auth
smtpd_sasl_local_domain =
smtpd_sasl_security_options = noanonymous
broken_sasl_auth_clients = yes
smtpd_sasl_auth_enable = yes
smtpd_recipient_restrictions = permit_sasl_authenticated,permit_mynetworks,reject_unauth_destination
smtp_tls_security_level = may
smtpd_tls_security_level = may
smtp_tls_note_starttls_offer = yes
smtpd_tls_loglevel = 1
smtpd_tls_key_file = /etc/postfix/ssl/server.key
smtpd_tls_cert_file = /etc/postfix/ssl/server.crt
smtpd_tls_received_header = yes
smtpd_tls_session_cache_timeout = 3600s
tls_random_source = dev:/dev/urandom
Step 6 » Open /etc/postfix/master.cf file, add the below lines after “smtp inet n – n – – smtpd” line.
submission     inet  n       -       n       -       -       smtpd
  -o syslog_name=postfix/submission
  -o smtpd_sasl_auth_enable=yes
  -o smtpd_recipient_restrictions=permit_sasl_authenticated,reject
  -o milter_macro_daemon_name=ORIGINATING
smtps     inet  n       -       n       -       -       smtpd
  -o syslog_name=postfix/smtps
  -o smtpd_sasl_auth_enable=yes
  -o smtpd_recipient_restrictions=permit_sasl_authenticated,reject
  -o milter_macro_daemon_name=ORIGINATING
Now check the configuration using postfix check command.
Step 7 » Now configure Dovecot SASL for SMTP Auth. Open /etc/dovecot/conf.d/10-master.conf file, find “# Postfix smtp-auth” line ( line no:95 ) and add the below lines.# Postfix smtp-auth
unix_listener /var/spool/postfix/private/auth {
mode = 0660
user = postfix
group = postfix
}
Step 8 » Open /etc/dovecot/conf.d/10-auth.conf file, find “auth_mechanisms = plain” ( Line no: 100 ) and add login to the value like below.auth_mechanisms = plain login
Step 9 » Postfix configuration is over. Now restart both postfix and dovecot services and enable auto start.[root@mail ~]# systemctl restart postfix
[root@mail ~]# systemctl enable postfix
[root@mail ~]# systemctl restart dovecot
[root@mail ~]# systemctl enable dovecot
Step 10 » Add the firewall rules to allow 25, 587 and 465 ports.[root@mail ~]# firewall-cmd --permanent --add-service=smtpNow start testing connectivity for each ports 25,587 and 465 using telnet and make sure you are getting AUTH PLAIN LOGIN line after issuing ehlo mail.krizna.com command in telnet.
[root@mail ~]# firewall-cmd --permanent --add-port=587/tcp
[root@mail ~]# firewall-cmd --permanent --add-port=465/tcp
[root@mail ~]# firewall-cmd --reload[root@mail ~]# telnet mail.krizna.com 465
Trying 172.27.0.51...
Connected to mail.krizna.com.
Escape character is '^]'.
220 mail.krizna.com ESMTP Postfix
ehlo mail.krizna.com
Start configuring Dovecot .
Step 11 » Open /etc/dovecot/conf.d/10-mail.conf file, find #mail_location = (line no : 30 ) and add the same directory which is given to home_mailbox in the postfix config file ( Step 5).mail_location = maildir:~/mail
Step 12 » Open /etc/dovecot/conf.d/20-pop3.conf file, find and uncomment the below line ( line no : 50 ) .pop3_uidl_format = %08Xu%08Xv
Step 13 » Restart dovecot service.[root@mail ~]# systemctl restart dovecot
Step 14 » Add firewall rules to allow 110,143,993 and 995.[root@mail ~]# firewall-cmd --permanent --add-port=110/tcp
[root@mail ~]# firewall-cmd --permanent --add-service=pop3s
[root@mail ~]# firewall-cmd --permanent --add-port=143/tcp
[root@mail ~]# firewall-cmd --permanent --add-service=imaps
[root@mail ~]# firewall-cmd --reload
Check the connectivity for the ports 110,143,993 and 995 using telnet.
Now create user for testing .
Step 15 » Create user with /sbin/nologin shell to restrict login access.[root@mail ~]# useradd -m john -s /sbin/nologin
[root@mail ~]# passwd john
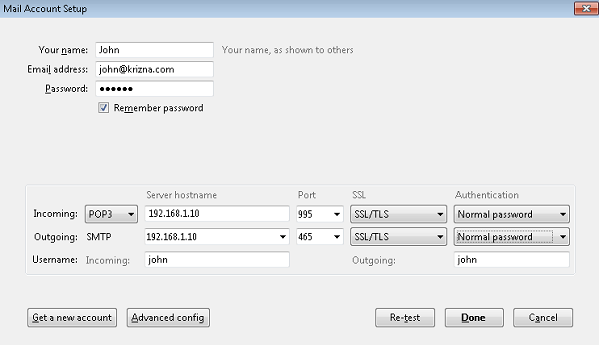
Mail server is ready now, Configure user in your mail client and test send/receive.
Also see :
» Setup mail server on ubuntu 14.04
» Setup mail server on centos 6
All the best.
Visual Studio Code is a popular code editor which is lightweight and cross platform application.…
MySQL workbench is a GUI tool for managing MySQL database system. It is used by…
Android Studio is a popular development software used especially for developing android applications. It is…
Google chrome is a most popular web browser developed by google. It was developed to…
Zoom is a popular video conferencing software. It is commonly used for conducting online meetings,…
TeamViewer is a popular application for desktop sharing and remote control. It is available for…