In this tutorial we can see the step by step installation of Apache webserver along with mysql and php enabled. This tutorial is very basic , Strictly for beginners or internal purpose .
After installing Centos 6 (Centos 6 installation step by step screenshots ) and configuring network (How to setup network in centos 6)
Update yum repositories and packages by typing the below command
[root@localhost ~]# yum update
After updating repositories , we can start installing packages one by one.
1. Apache2 installation and configuration
2. Mysql installation
3. PHP installation
4. Testing all together
Apache2 package installation and configuration is very simple .
Step 1 » just type the command
[root@localhost ~]# yum install httpd
This command will install httpd package along with dependencies
After installing the package .
Step 2 » Open the file /etc/httpd/conf/httpd.conf .
Find “#ServerName www.example.com:80” (line no : 276 ) .#
#ServerName www.example.com:80
and add this line below . “ServerName youripaddress:80”
#

#ServerName www.example.com:80
ServerName 192.168.141.22:80
Step 3 » Now start apache service
[root@localhost ~]# service httpd start
and type this below command to start apache service automatically while booting.
[root@localhost ~]# chkconfig --levels 235 httpd on
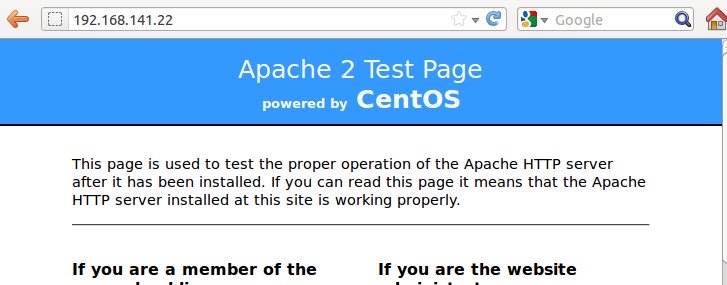
Step 4 » Now you have successfully configured apache web server . open your browser and type the ip address in the address bar and hit enter . you can see the test page of your web server .
Goto the default apache root path /var/www/html . create a new file index.html and paste the below code and save it.
Again open the webserver ip address in the browser . you can see the index page created by you.
Step 1 » just type the command to install mysql server and client packages along with dependencies .
[root@localhost ~]# yum install mysql-server
After installation packages and dependencies .
Step 2 » Start mysql service
[root@localhost ~]# service mysqld start
and type this below command to start mysql server automatically while booting.
[root@localhost ~]# chkconfig --levels 235 mysqld on
Step 3 » Create a new root password for mysqlserver
[root@localhost ~]# mysqladmin -u root password '********'
Step 4 » Test your mysql server by login as root
[root@localhost ~]# mysql -u root -p ( press enter )

Enter password:(Type your mysql root password and press enter)
Now you can see the mysql prompt.[root@localhost ~]# mysql -u root -p
Enter password:
Welcome to the MySQL monitor. Commands end with ; or g.
Your MySQL connection id is 3
Server version: 5.1.61 Source distribution
Copyright (c) 2000, 2011, Oracle and/or its affiliates. All rights reserved.
Oracle is a registered trademark of Oracle Corporation and/or its
affiliates. Other names may be trademarks of their respective
owners.
Type 'help;' or 'h' for help. Type 'c' to clear the current input statement.
mysql>
Step 1 » Install php package along with php-mysql .[root@localhost ~]# yum install php php-mysql
After installing php , create a php info file to test your php configuration .
Step 2 » Goto the default apache root path /var/www/html . create a new file phpinfo.php and paste the below code and save it.
<?php
phpinfo();
?>
Step 3 » Restart apache service
[root@localhost ~]# service httpd restart
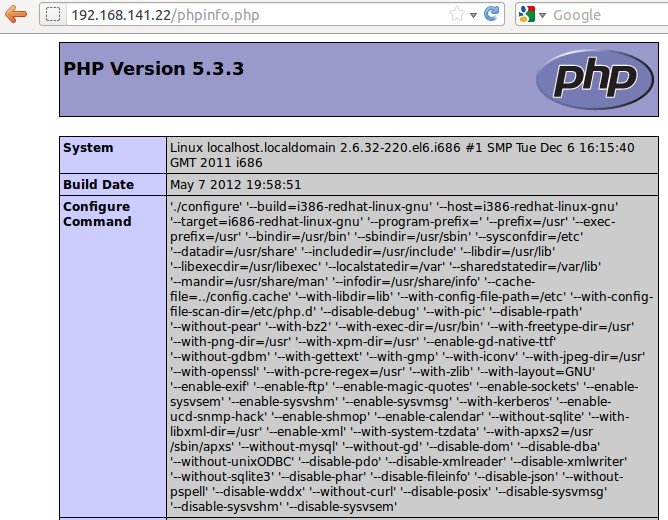
Step 4 » open the filepath in the browser ( http://192.168.141.22/phpinfo.php ). you can see the php information page as below.
and make sure you can see the mysql details in the php information page .
Finally apache2 , php and mysql has been configured perfectly . few more steps need to be performed to check the database connectivity.
We need to test mysql database connectivity in php .
Step 1 » create a new file dbtest.php in the apache root path (/var/www/html) and paste the below code .Replace “password” with your mysql root password.
<?php
$con = mysql_connect("localhost","root","password");
if (!$con)
{
die('Could not connect: ' . mysql_error());
}
else
{
echo "Congrats! connection established successfully";
}
mysql_close($con);
?>
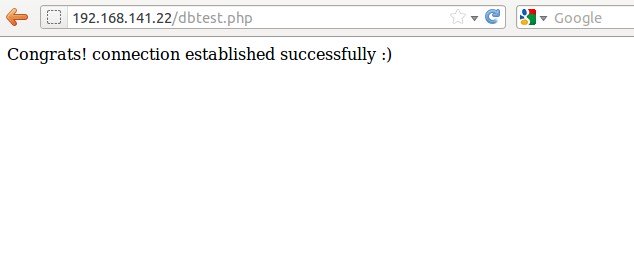
Step 2 » open the filepath in the browser ( http://192.168.141.22/dbtest.php ). you can see the page as below.
If you are getting some errors like
» Could not connect: Can’t connect to local MySQL server through socket ‘/var/lib/mysql/mysql.sock’ (2)
( This means your mysql server service is stopped , you must start the service “service mysql start”)
» Could not connect: Access denied for user ‘root’@’localhost’ (using password: YES)
(Something wrong with username and password )
if you are getting a blank page , then must be a problem with the code .
Like this post » just buy me a beer or leave a comment
Also see
Visual Studio Code is a popular code editor which is lightweight and cross platform application.…
MySQL workbench is a GUI tool for managing MySQL database system. It is used by…
Android Studio is a popular development software used especially for developing android applications. It is…
Google chrome is a most popular web browser developed by google. It was developed to…
Zoom is a popular video conferencing software. It is commonly used for conducting online meetings,…
TeamViewer is a popular application for desktop sharing and remote control. It is available for…