Phpmyadmin is a free tool used to administrate MySQL . it supports all major operation with MySQL in GUI mode.
In the previous post we saw about installing and configuring nginx on centos 6.5 . Here we can see about installing phpmyadmin on nginx server.
Before starting please make sure you have installed LEMP stack ( Nginx , mysql and php )
Refer this post (Install LEMP on centos 6)
Step 1 » Enable EPEL repository for installing dependencies . Find the latest release file from EPEL 6 repository and install using rpm command.[root@krizna ~]# rpm -ivh http://epel.mirror.net.in/epel/6/i386/epel-release-6-8.noarch.rpm
Step 2 » Install dependencies by the below command.[root@krizna ~]# yum install php php-cli php-gd php-mbstring php-mcrypt php-php-gettext apr-util-ldap mailcap
Step 3 » Download latest phpmyadmin from official site ( Phpmyadmin Download ) to /usr/share/ directory. choose .tar.bz2 for less size and easy extraction with default tar command.[root@krizna ~]# cd /usr/share/
[root@krizna share]# wget http://downloads.sourceforge.net/project/phpmyadmin/phpMyAdmin/4.1.7/phpMyAdmin-4.1.7-all-languages.tar.bz2
Step 4 » Extract the files using the below command.[root@krizna share]# tar -xvf phpMyAdmin-4.1.7-all-languages.tar.bz2
Step 5 » Rename the folder .[root@krizna share]# mv phpMyAdmin-4.1.7-all-languages phpmyadmin
Step 6 » Create a config file inside phpmyadmin folder. just copy config.sample.inc.php into config.inc.php file .[root@krizna phpmyadmin]# cp config.sample.inc.php config.inc.php
Step 7 » Create a virtual site to access phpmyadmin in 8080 port . Create a file /etc/nginx/conf.d/phpmyadmin.conf and add the below lines .
server {
    listen       8080;                          # listen port
    server_name  localhost;                     # Server name (www.krizna.com)
    location / {
        root   /usr/share/phpmyadmin;           # Document root
        index index.php  index.html index.htm;
    }
    location ~ .php$ {
        root           /usr/share/phpmyadmin;   # Document root
        fastcgi_pass   127.0.0.1:9000;
        fastcgi_index  index.php;
        fastcgi_param  SCRIPT_FILENAME  $document_root$fastcgi_script_name;
        include        fastcgi_params;
    }
}
Step 8 » Restart nginx service.[root@krizna ~]# service nginx restart
Open /etc/sysconfig/iptables file and add the following line to open port 8080 in iptables.-A INPUT -m state --state NEW -p tcp --dport 8080 -j ACCEPT
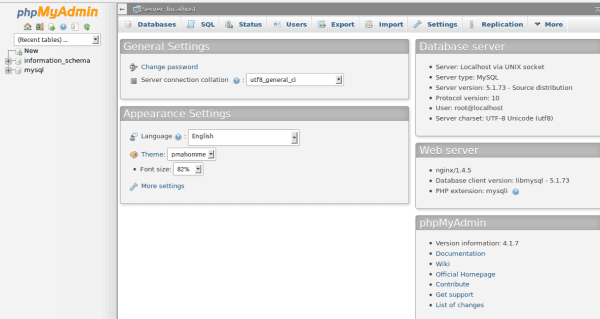
Step 9 » Now open http://serverip:8080 in your browser . you could see phpmyadmin login page . use mysql root username and password to login . after logged in, you can see the page below.
All the best.
Visual Studio Code is a popular code editor which is lightweight and cross platform application.…
MySQL workbench is a GUI tool for managing MySQL database system. It is used by…
Android Studio is a popular development software used especially for developing android applications. It is…
Google chrome is a most popular web browser developed by google. It was developed to…
Zoom is a popular video conferencing software. It is commonly used for conducting online meetings,…
TeamViewer is a popular application for desktop sharing and remote control. It is available for…