Cacti is one of best monitoring tool used to monitor network, CPU load, memory, Disk and other services.
Cacti uses PHP for front end, RRDTool for graphing and mysql for storage.
Cacti installation on centos requires LAMP setup and SNMP.
Before installing cacti, first we need to setup apache with php, mysql and SNMP services. you can also refer this post (Installing Apache2 , Mysql server and PHP on Centos 6 (LAMP)) for complete LAMP setup.
Install cacti on centos 6.
Step 1 » Issue the below command to install apache, php and mysql.[root@krizna ~]# yum install mysql-server mysql php php-mysql httpd
Step 2 » Start mysql and apache service[root@krizna ~]# chkconfig --level 235 httpd on
[root@krizna ~]# service httpd start
[root@krizna ~]# chkconfig --level 235 mysqld on
[root@krizna ~]# service mysqld start
Step 3 » Issue the below command to create mysql root password.[root@krizna ~]# mysqladmin -u root password 'newpassword'
[and]
issue this command to secure your mysql database.[root@krizna ~]# /usr/bin/mysql_secure_installation
Step 4 » Create new database “cactidb” and username/password to access “cactidb” database .[root@krizna ~]# mysql -u root -pmysql> create database cactidb;
Query OK, 1 row affected (0.00 sec)mysql> GRANT ALL ON cactidb.* TO usercacti@localhost IDENTIFIED BY 'passwordcacti';
Query OK, 0 rows affected (0.00 sec)
mysql> quit
Here “usercacti” is the username and “passwordcacti” is the password to access “cactidb” database.
Step 5 » Now install SNMP by typing the below command.[root@krizna ~]# yum install net-snmp-utils php-snmp net-snmp-libs
Step 6 » Rename the original snmpd.conf file and create a new one .[root@krizna ~]# mv /etc/snmp/snmpd.conf snmpd.conf.org
[root@krizna ~]# touch /etc/snmp/snmpd.conf
Step 7 » Add the below lines to /etc/snmp/snmpd.conf ( New file ).
com2sec local     localhost           public
group MyRWGroup v1         local
group MyRWGroup v2c        local
group MyRWGroup usm        local
view all    included  .1                               80
access MyRWGroup ""      any       noauth    exact  all    all    none
syslocation srvroom , linux monitor
syscontact krizna  (admin@krizna.com)
Step 8 » Now start the snmp service[root@krizna ~]# chkconfig --level 235 snmpd on
[root@krizna ~]# service snmpd start
Step 9 » Issue the below command to test your snmp config[root@krizna ~]# snmpwalk -v 1 -c public localhost IP-MIB::ipAdEntIfIndex
IP-MIB::ipAdEntIfIndex.127.0.0.1 = INTEGER: 1
IP-MIB::ipAdEntIfIndex.192.168.1.10 = INTEGER: 2
You should able to get your ip details .
For installing cacti through yum , you must enable EPEL repository. you can find latest EPEL repository rpm here ( http://ftp.jaist.ac.jp/pub/Linux/Fedora/epel/6/i386/repoview/epel-release.html )
Step 10 »Install the latest EPEL rpm .[root@krizna ~]# rpm -ivh http://ftp.jaist.ac.jp/pub/Linux/Fedora/epel/6/i386/epel-release-6-8.noarch.rpm
Step 11 » Install cacti through yum[root@krizna ~]# yum install cacti
Step 12 » Now import cacti database tables from the file cacti.sql . Issue the below command to find the location of cacti.sql file.[root@krizna ~]# rpm -ql cacti | grep cacti.sql
/usr/share/doc/cacti-0.8.8a/cacti.sql
Issue the below command to import tables to cactidb[root@krizna ~]# mysql -u root -p cactidb < /usr/share/doc/cacti-0.8.8a/cacti.sql
Step 13 » Now open /etc/cacti/db.php file and edit the below lines .
$database_default = "cactidb";
$database_hostname = "localhost";
$database_username = "usercacti";
$database_password = "passwordcacti";
Step 14 » Open /etc/httpd/conf.d/cacti.conf file and comment all “Deny from all” lines.
Step 15 » open /etc/cron.d/cacti file and uncomment the line .*/5 * * * * cacti /usr/bin/php /usr/share/cacti/poller.php > /dev/null 2>&1
Step 16» Now restart apache and cron services[root@krizna ~]# service httpd restart
[root@krizna ~]# service crond restart
Step 17» Now open http://serverip/cacti in your browser , you can see the cacti installation page.
if you are not getting installation page , Disable the firewall ( iptables ) and selinux service on your server .
Disable firewall ( Iptables ) »[root@krizna ~]# service iptables stop
[root@krizna ~]# chkconfig iptables off
Disable Selinux » open the file /etc/selinux/config and find the lineSELINUX=enforcing
and replace withSELINUX=disabled
now reboot the server and try again.
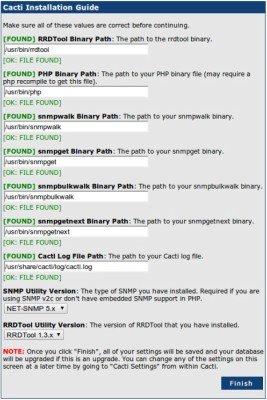
After getting installation page, proceed with the default values and make sure all the binary paths are found as per the below image.
upon completion, you can see the login prompt .
Step 18» The default username and password for cacti is admin/admin. you will be forced to change the password at first login.
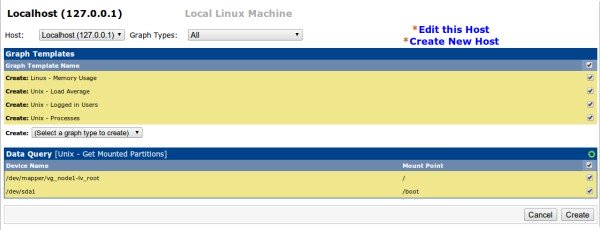
Step 19» After login . Choose – > Devices – > Localhost and find “SNMP Options“. select SNMP Version -> “Version 2” and SNMP Community -> public and click the “save” button at the bottom.
Step 20» Now you can see the SNMP information at the TOP . Click “Create Graphs for this Host” and choose Graph Types:-> ALL and choose all the check boxes as below and press “create“. Now choose the colour option ( Leave as it is ) and press “create“.
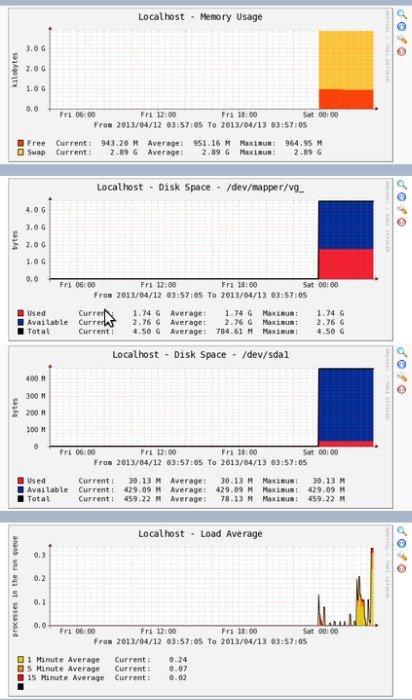
After few minutes , you can see the initial stage of graphs for localhost in the Graphs section . after few hours you can see the graphs like below .
» Follow steps 5,6,7,8 and 9 ( In client ).
» Now in cacti , “Create devices” and Add description and hostname (or) IP .
» Choose “Host Template” as “Local linux machine”.
» Under SNMP Options select SNMP Version -> “Version 2” and SNMP Community -> public and click the “save” button at the bottom.
» Follow step 20
» Add the device to the Graph tree.
» Enable SNMP service ( Refer this post )
» Make sure you added community name “public” and allowed your Cacti server IP.
» Now in cacti , “Create devices” and Add description and hostname (or) IP .
» Choose “Host Template” as “Windows 2000/XP host”.
» Under SNMP Options select SNMP Version -> “Version 2” and SNMP Community -> public and click the “save” button at the bottom.
» Follow step 20
» Add the device to the Graph tree.
Good luck
Visual Studio Code is a popular code editor which is lightweight and cross platform application.…
MySQL workbench is a GUI tool for managing MySQL database system. It is used by…
Android Studio is a popular development software used especially for developing android applications. It is…
Google chrome is a most popular web browser developed by google. It was developed to…
Zoom is a popular video conferencing software. It is commonly used for conducting online meetings,…
TeamViewer is a popular application for desktop sharing and remote control. It is available for…